This guide walks you through every step of migrating from Beds24 to Nowistay as your channel manager and property management platform. The whole process takes about 15 minutes per property.
Airbnb only allows one channel manager per account, and Booking.com one per property, so you’ll need to disconnect your channels from Beds24 before connecting them to Nowistay. Don’t worry, we’ll guide you through each step.
Why switch from Beds24 to Nowistay?
AI co-host: Nowistay’s AI autonomously handles all your guest messages 24/7 on Airbnb, Booking.com and WhatsApp. No manual replies needed: the AI uses your welcome guide and property information to answer accurately.
Simpler, modern interface: Nowistay’s UX is clean and intuitive. You get the same channel management reliability as Beds24, with a much easier interface to navigate.
Centralized calendar and pricing: manage availability and rates across all platforms from a single, clear visual calendar.
Team management & cleaning automation: automatic cleaning task creation on checkout, assign cleaning teams, checklists with photo reports, task tracking.
ChatGPT & Claude connectors (MCP): connect your properties to AI assistants like ChatGPT or Claude for advanced property management workflows. Learn more.
Dynamic pricing: PriceLabs integration for automated rate optimization.
Before you start
Prepare the following before starting the migration:
Note your current Beds24 settings: especially your pricing, minimum/maximum stay rules, check-in and check-out times for each property. You’ll set these up again in Nowistay.
Export your upcoming direct bookings: the bookings that did not come from Airbnb or Booking.com (direct, phone, Vrbo). Save them as a CSV file from Beds24: you will import them into Nowistay.
Check for pending bookings: make sure all your current and upcoming bookings are confirmed and noted. They will remain on the OTA platforms and will be synced to Nowistay once connected.
Have your Airbnb owner credentials ready: you’ll need to log in with the account that owns the listings (not a co-host account).
Have your Booking.com extranet access ready: you’ll need it to disconnect the channel manager and later reconnect with Nowistay.
Create a Nowistay account: sign up at app.nowistay.com if you don’t have one yet.
Things to know before migrating
Connecting Nowistay as your channel manager triggers a few automatic changes on Airbnb. Here is a quick summary:
Fee model change: Airbnb may switch your entire account to the host-only fee model (about 15.5%). Use Nowistay’s Rate Adjustment feature to increase your Airbnb nightly rate and keep the same net revenue. This has zero impact on bookings since guests always see the total price.
Calendar managed from Nowistay: prices and availability are now set from the Nowistay calendar. This gives you a single centralized view across all platforms.
Instant booking: may be activated automatically. You can limit it to experienced guests or try switching back to manual approval.
iCal links removed: Nowistay’s real-time sync replaces iCal, which is more reliable.
Some Airbnb settings become read-only: Smart Pricing, promotions, and stay rules should now be managed in Nowistay.
All listings affected: changes apply to your entire Airbnb account, even unmapped listings. Connect all your properties to Nowistay to benefit from centralized management.
You need to unlink your Airbnb listings from Beds24 before you can connect them to Nowistay. There are two ways: we recommend Method 1, which works from Airbnb directly and disconnects all your listings at once.
Method 1 (recommended): Remove Beds24’s access from Airbnb
Log into Airbnb with the account that owns the listings.
Click Menu (your profile picture, top right), then Account settings.
Open Privacy.
Under Connected services, find the Beds24 connection (it may appear as Channelsync) and click Remove access, then confirm.
Method 2: Disconnect from Beds24
Log into your Beds24 account.
Go to (SETTINGS) CHANNEL MANAGER > AIRBNB > MAPPING.
Click Disconnect next to each listing you want to migrate.
Then go to (SETTINGS) CHANNEL MANAGER > AIRBNB > ACCOUNTS and click Disconnect to fully disconnect your Airbnb account from Beds24.
Important: When you disconnect a listing from Beds24, Airbnb automatically resets some values to their defaults:
Minimum stay is reset to 1 night
“Closed to arrival” and “Closed to departure” restrictions are removed
Maximum stay is reset to 1,125 nights
Don’t worry, you’ll configure these settings again in Nowistay after connecting.
Booking.com lets you switch directly from Beds24 to Nowistay in the Booking.com extranet. Your property stays connected to Beds24 until the switch is complete:
Write down your Hotel ID, the number shown next to your property name at the top of the extranet. You will need it in Step 4.
Click Account, then Connectivity provider.
Click Switch providers. Do not click Deactivate: it resets your settings and leaves the property without a provider.
Search for the full word Channex (partial words are not recognized), select Channex.io, Nowistay’s connectivity partner, tick the box to accept the terms and confirm.
Important: This only changes the channel manager link. Your property, listings and bookings on Booking.com remain intact. Repeat it for each Booking.com property.
Now that your OTA channels are disconnected from Beds24, let’s connect them to Nowistay. Choose the option that matches your situation:
Option A: You already have a property on Nowistay with the Beds24 connector
If your property is already on Nowistay connected via the Beds24 PMS integration (using the Beds24 invitation code), you don’t need to add a new property. Simply switch the synchronization method:
Click the … button on the card of the property you want to migrate.
Click Synchronization.
Open Advanced settings, click Modify synchronisation method, then Confirm.
To Do you currently use a channel manager (PMS) for this property?, answer No, I don’t use a PMS.
Click Enable Nowistay, then Enable Nowistay again in the dialog.
Click Add a booking platform (OTA), select Airbnb, connect your Airbnb owner account and select the listing to map, then click Connect.
You can now remove the co-host from your Airbnb listing and the Booking.com contact from the Booking.com extranet: they are no longer needed.
Your existing assistant configuration, welcome guide, and settings will be preserved. Only the synchronization method changes.
Coming from the Beds24 connection? Switching the method deletes the bookings that came from that PMS, past and upcoming. Upcoming Airbnb and Booking.com reservations come back when you connect those channels, but direct bookings do not: before switching, go to Bookings, click the … button and Download CSV, then import them again (Step 7). Bookings created in Nowistay itself (manual bookings, direct booking widget) are kept.
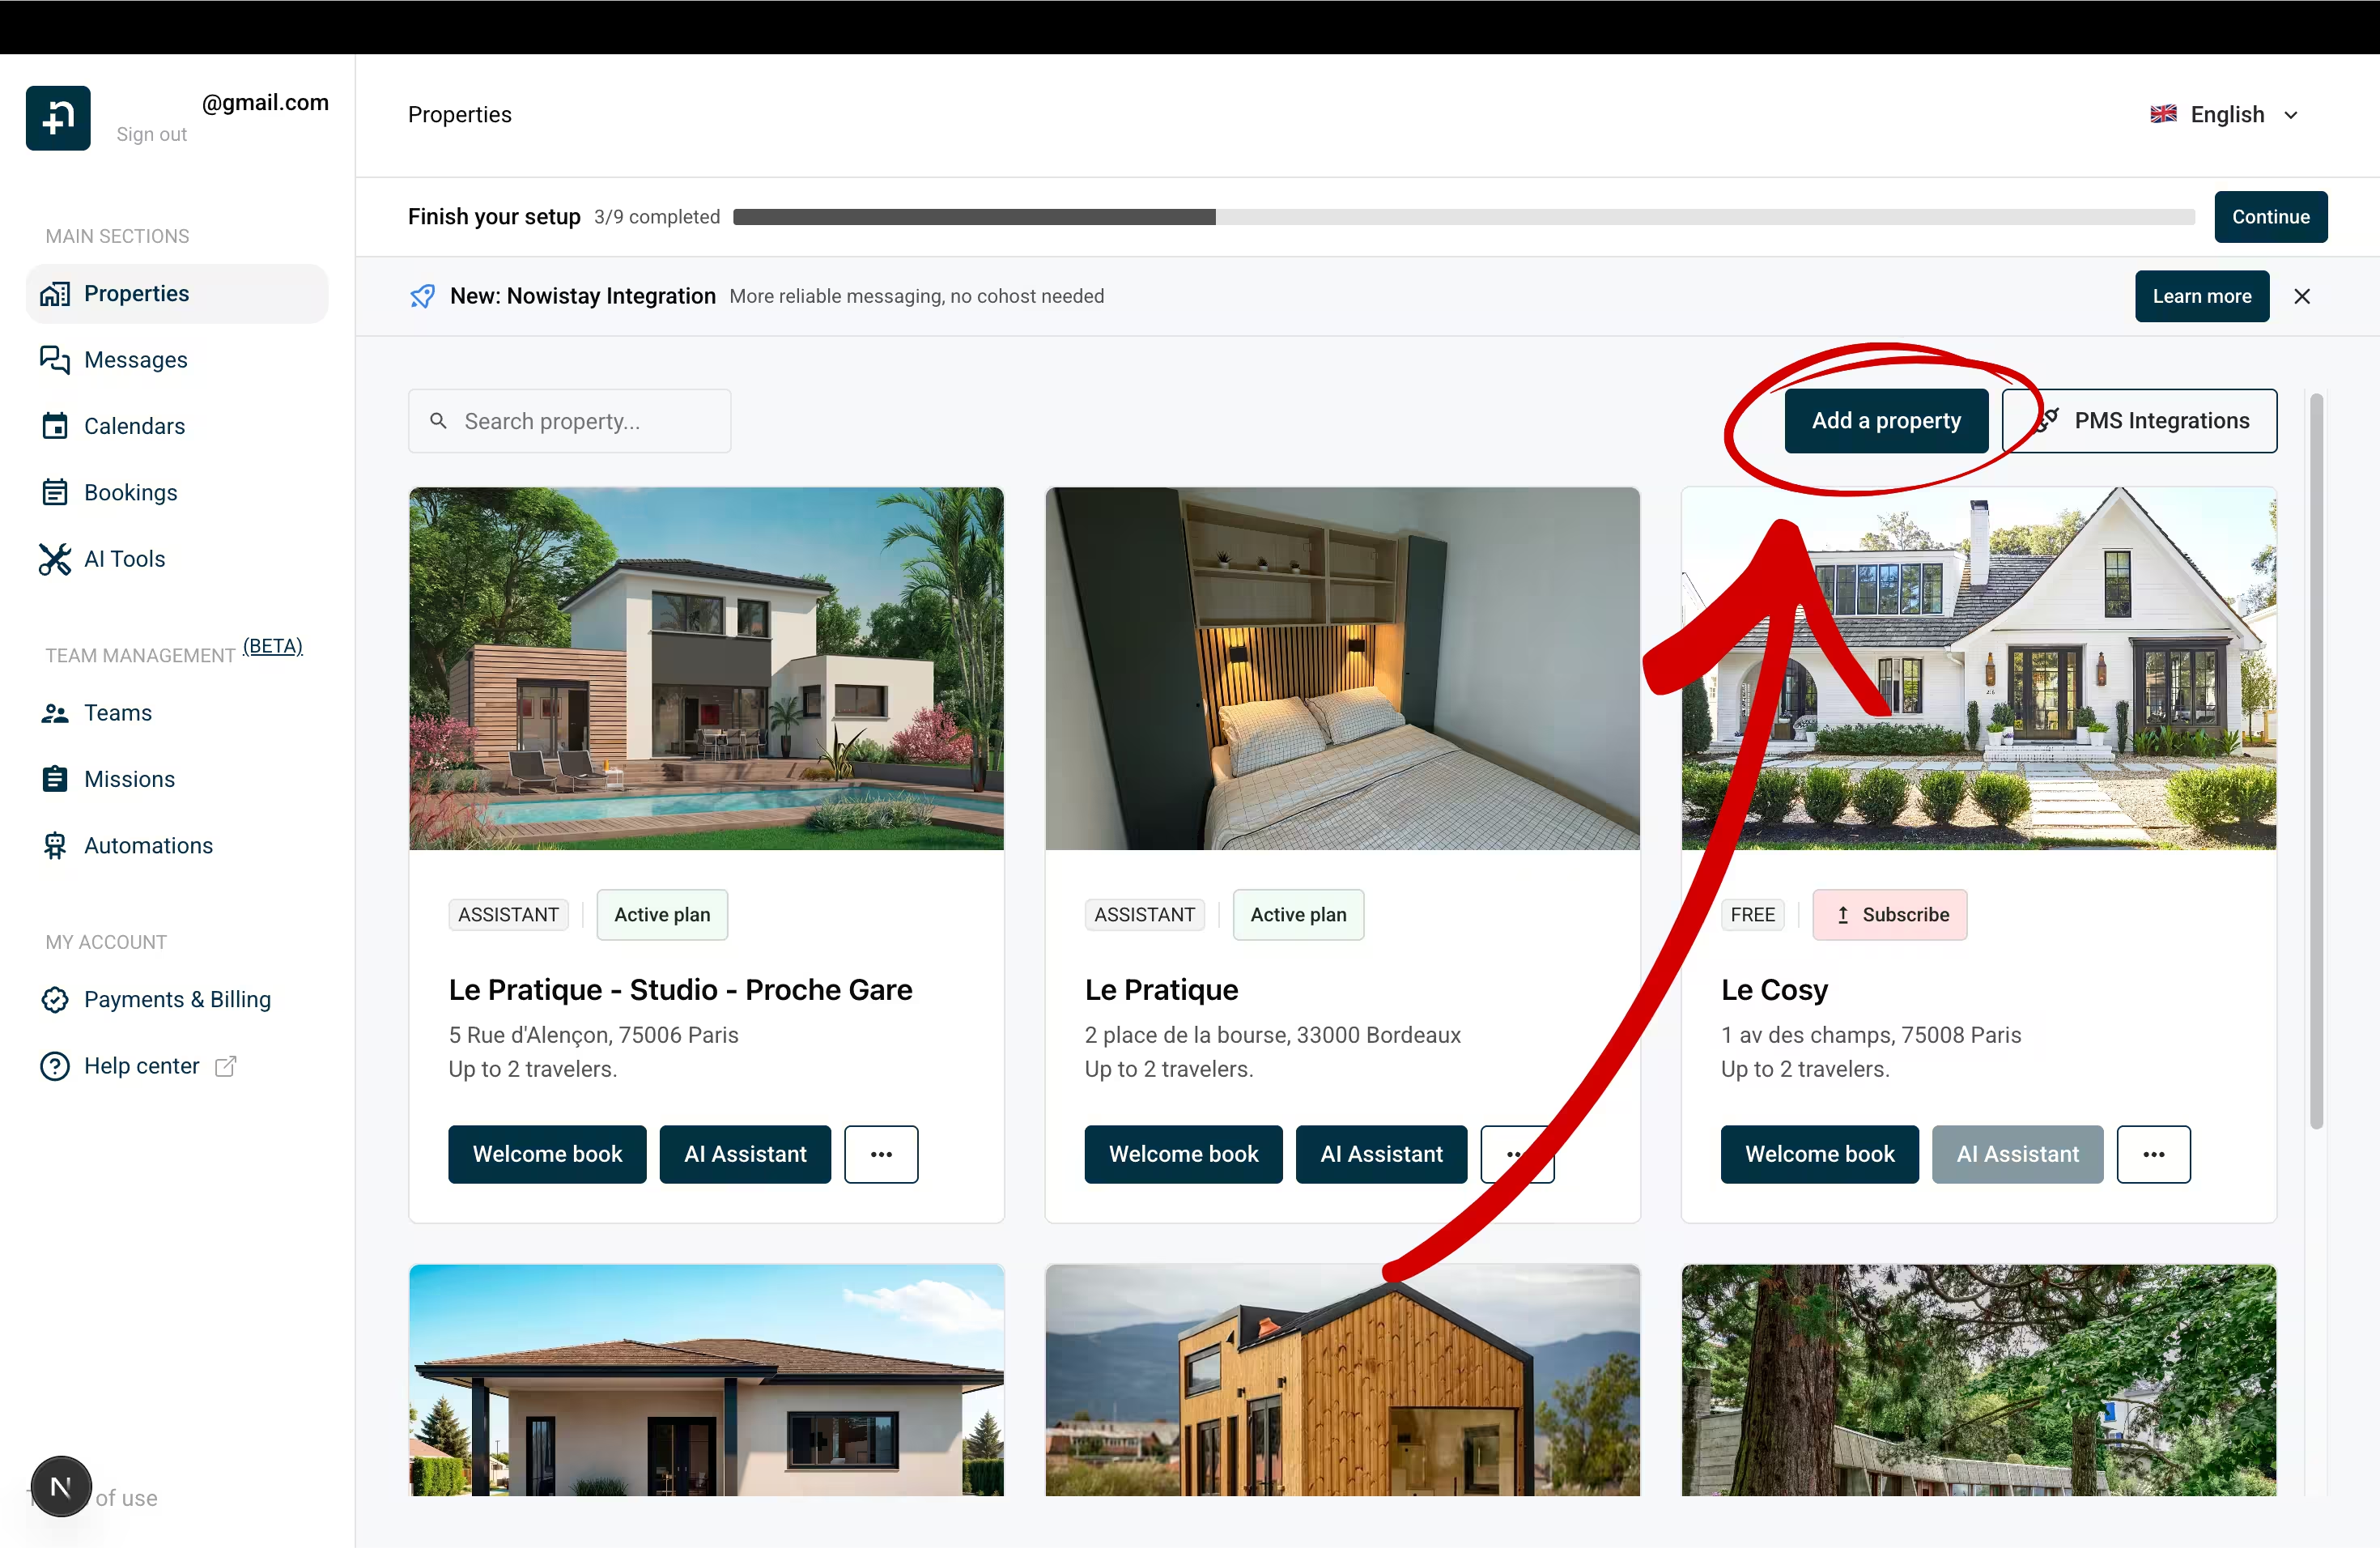
Go to your property list in Nowistay and click Add a property.
To How do you manage your bookings today?, answer I use a PMS, then to Do you want to keep your current PMS?, answer No, migrate.
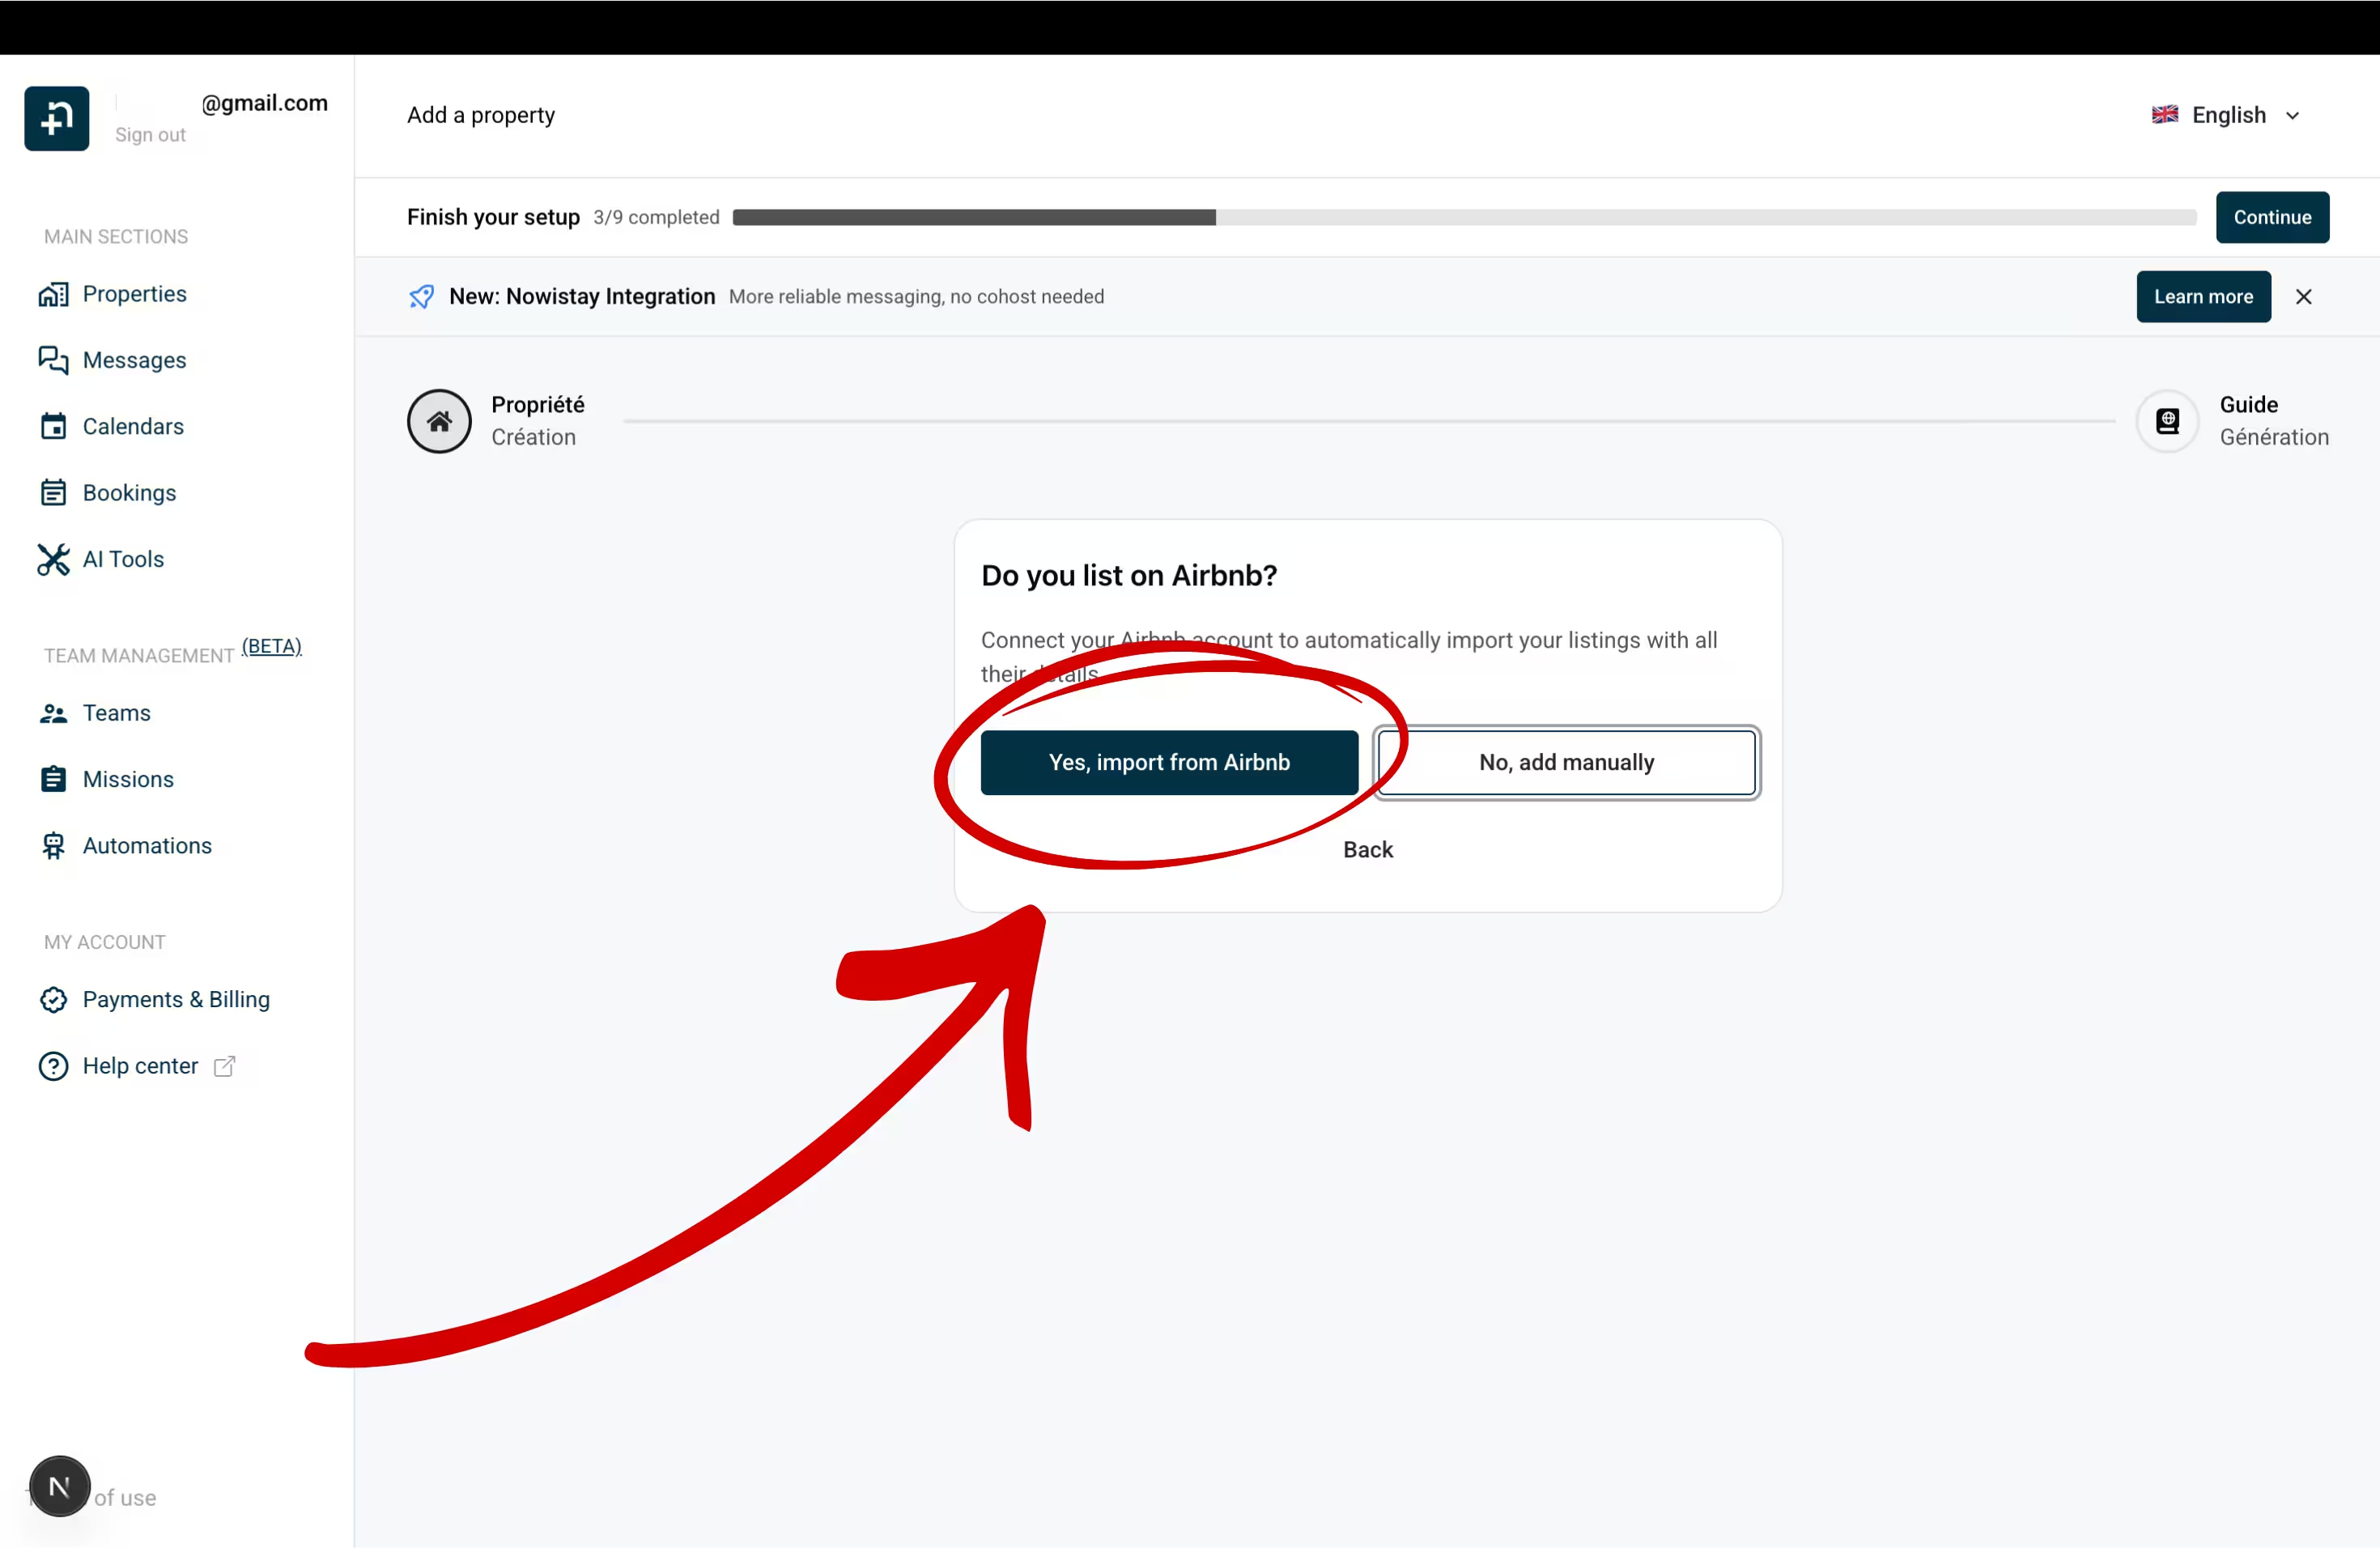
To Do you list on Airbnb?, click Yes, import from Airbnb.
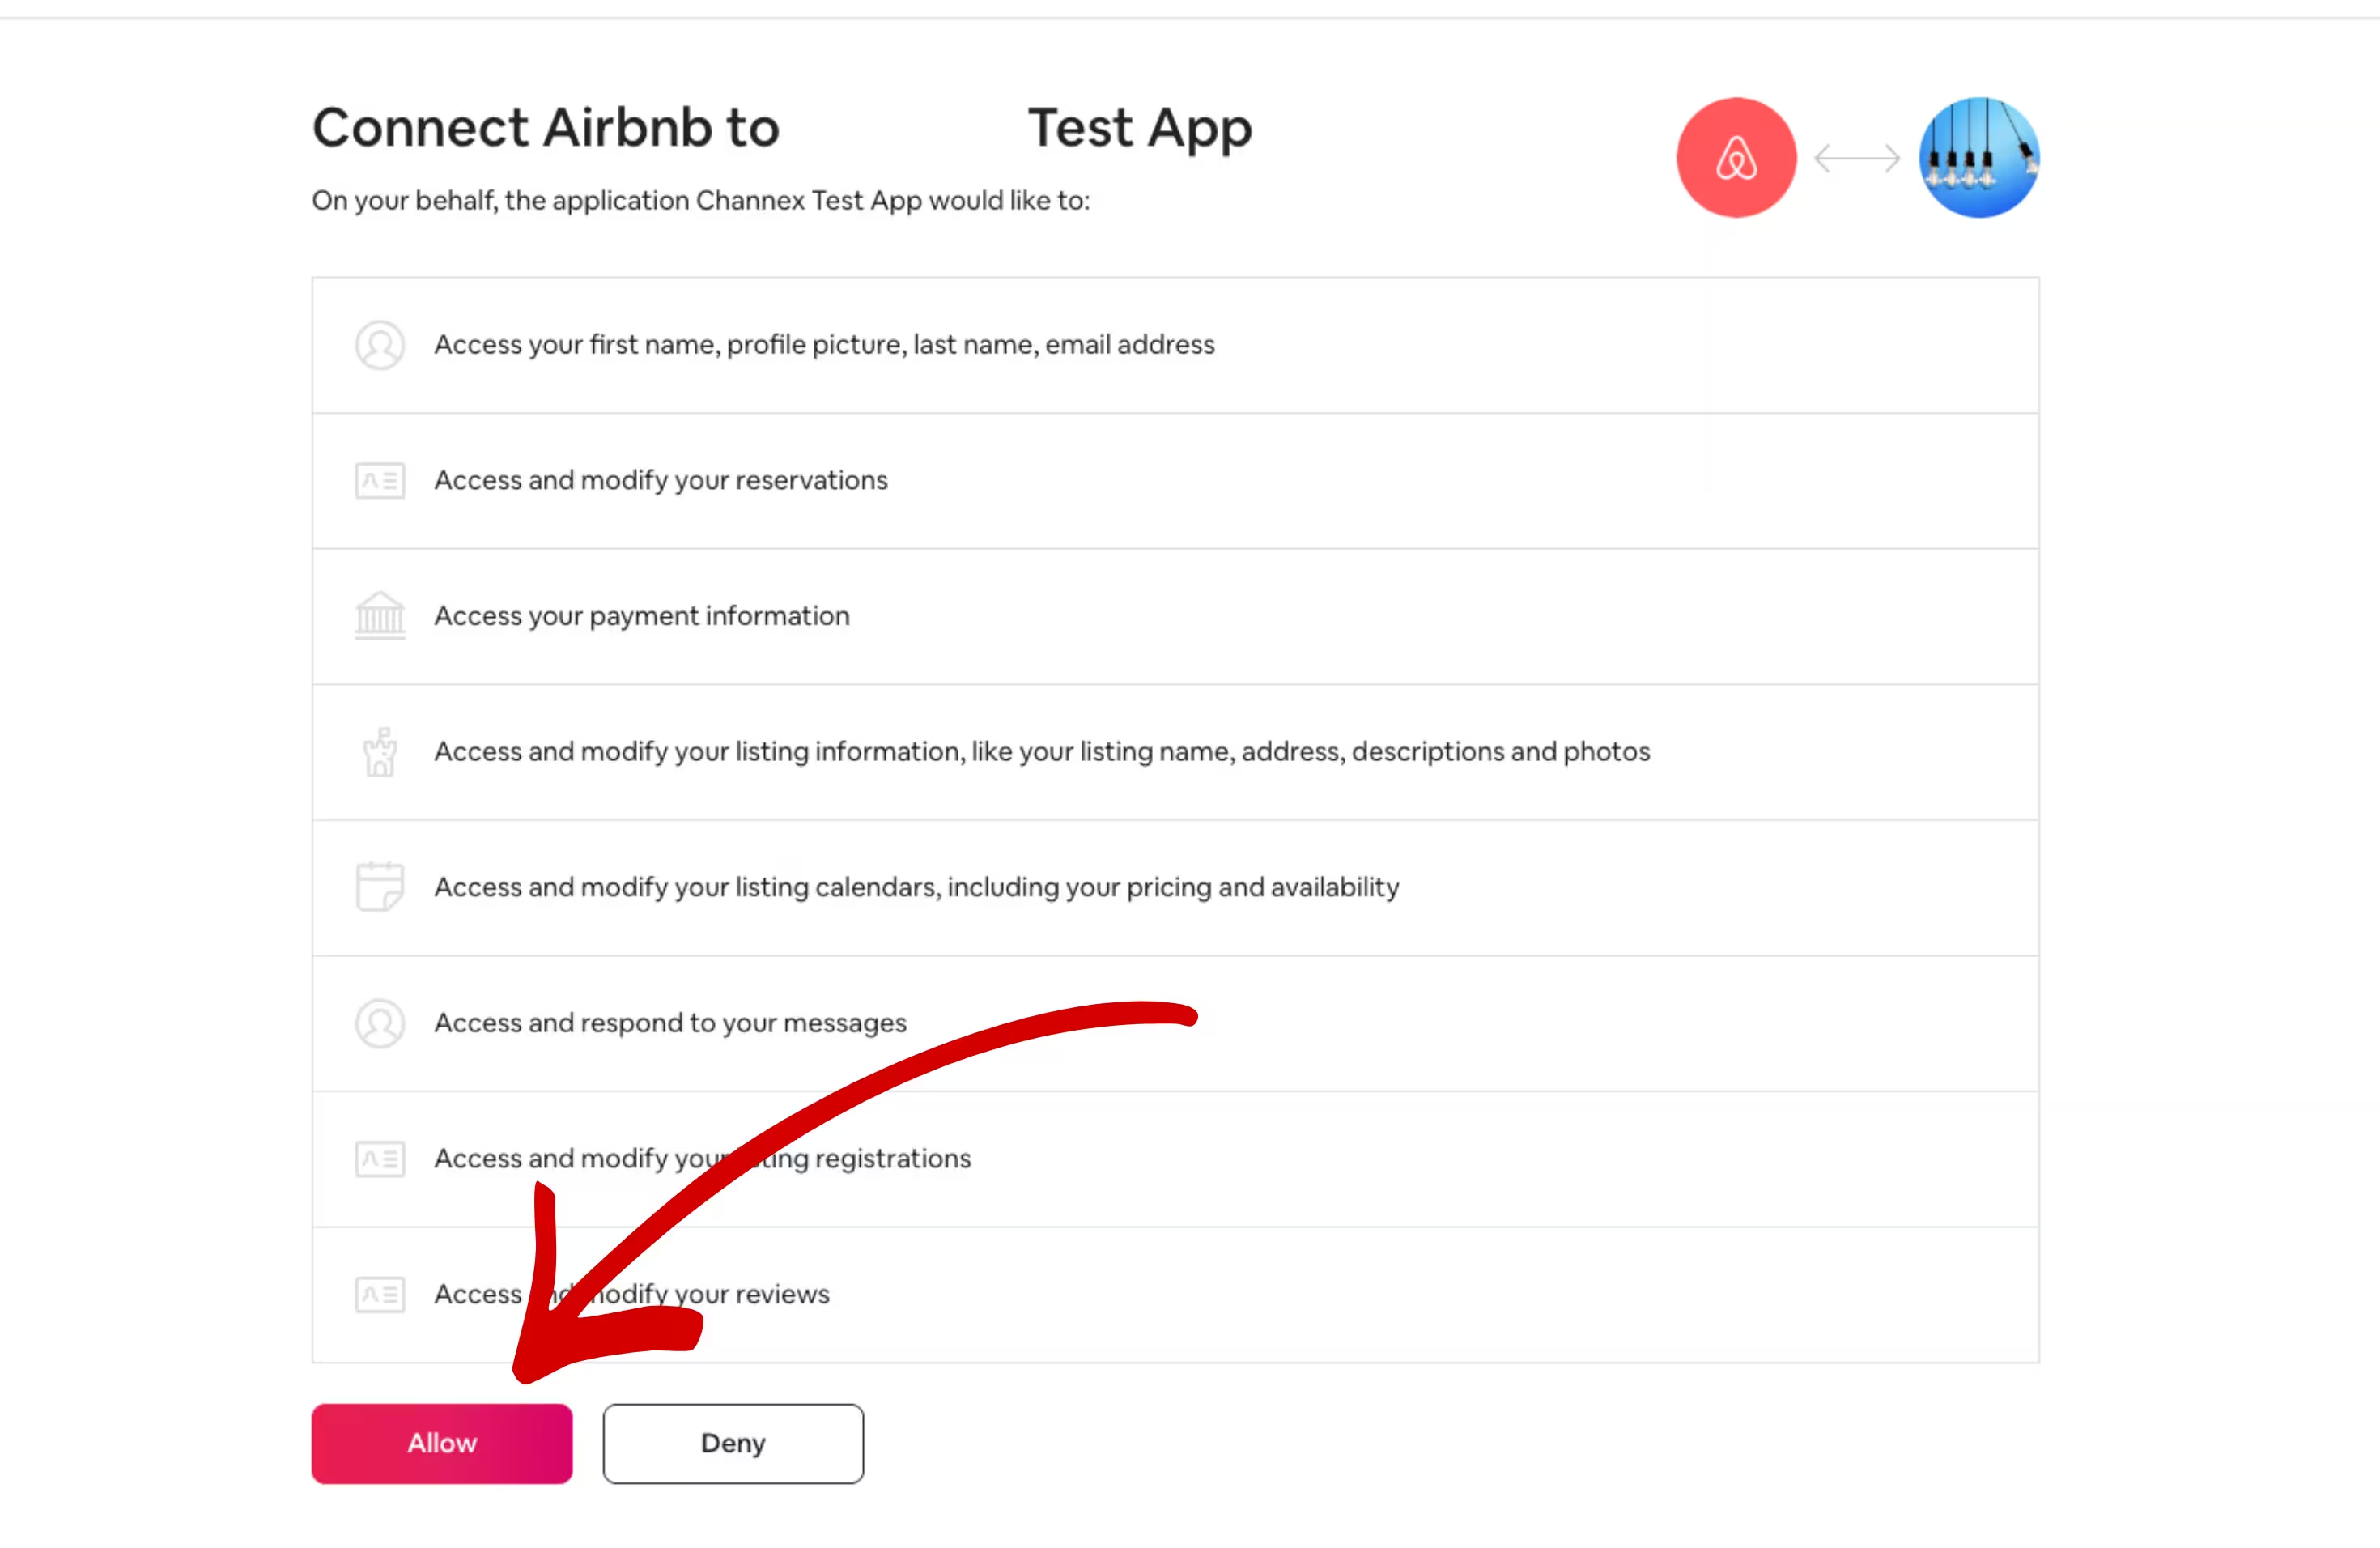
If an Airbnb account is already connected to Nowistay, its remaining listings are shown first; click Use another Airbnb account to connect a different one, or Connect with Airbnb when none is connected yet. You’ll be redirected to Airbnb: sign out of any other Airbnb account first (Airbnb authorizes the account currently logged in), log in with your owner account and click Allow to authorize the connection. Co-host only? Use Ask the owner to authorize instead, as explained in How to connect the AI Co-host to my Airbnb listing.
Back in Nowistay, select which Airbnb listing(s) to import and click Import (the button shows the number of selected properties).
Your property is created automatically with all your Airbnb data: name, photos, description, pricing, and more.
After connecting your property (via Option A or B), you can add Booking.com as an additional channel:
On the Properties page, click the … button on the property card, then Synchronization.
Click Add a booking platform (OTA) and select Booking.com in OTA Platform.
If not done yet, switch the connectivity provider to Channex.io in the Booking.com extranet (Step 2).
Enter your Hotel ID (shown in the Booking.com extranet header, next to your property name) and click Next.
Find your Hotel ID in the Booking.com extranet header
If your property has multiple room types, select the one to sync in Room Type.
Click Connect.
If Booking.com is the first channel of this property, Nowistay first asks for a Default night rate.
\1
Vrbo and Expedia are added the same way, with Add a booking platform (OTA). For Vrbo, your previous PMS must first be disconnected by Vrbo: see How to connect your Vrbo listing. For Expedia, select Channex as connectivity provider in Expedia Partner Central (Rooms and Rates > Connectivity Settings), then enter your Expedia Hotel ID in Nowistay.
Step 5: Set up your Welcome Guide
After creating your property, Nowistay will guide you to create a Welcome Guide: a digital guest handbook that the AI uses to answer questions.
Guide creation wizard (recommended): select key sections and let the AI generate content using your Airbnb listing and any PDF documents you upload.
Copy from an existing guide: duplicate a guide from another property.
Create from scratch: build your guide manually.
The more complete your guide is, the better the AI can answer guest questions about your property.
Step 6: Your AI assistant is ready
Once your property and welcome guide are set up, your AI co-host activates automatically. It will:
Respond to all guest messages on Airbnb, Booking.com and WhatsApp
Handle booking inquiries from the very first message
Use your welcome guide and property information to provide accurate answers
Work 24/7 without any action needed from you
You can review and customize the assistant’s personality, tone and rules in the Assistant config drawer, opened with the AI button on each property card.
Step 7: Verify your calendar and availability settings
This is a critical step. Right after connecting your OTA channels, check your calendar immediately to make sure everything looks correct. Some settings may have been reset during the disconnection from Beds24.
Review each property’s calendar carefully. Look for:
Nightly rates: verify your prices are correct for the coming weeks and months. Click any date to adjust the rate if needed.
Availability: make sure the right dates are open (green) or closed (red). Dates that should be available might appear closed, or vice versa.
Minimum stay: as mentioned earlier, disconnecting from Beds24 resets minimum stay to 1 night on Airbnb. Set your minimum stay rules again from the calendar by clicking a date range, enabling “Minimum Stay” and entering the desired number of nights.
Maximum stay: also reset to 1,125 nights. Set your preferred maximum if needed via “Advanced settings” in the calendar date editor.
Use the day-of-week filter to apply different rates or rules for weekdays vs. weekends efficiently.
Go to your property details page (from properties page then ”…” then “Property infos”) and verify:
Check-in / check-out times: make sure they match what you had on Beds24.
Nightly rate: your default base rate.
Cut-off time: how far in advance guests must book (e.g., same day, 1 day, 2 days).
Default minimum and maximum stay: baseline rules applied across all dates.
Configure Airbnb availability settings
These are Airbnb-specific rules managed from the Channel settings panel. They are especially important after migration because disconnecting from Beds24 may have reset them.
Go to your property’s Synchronization section (from properties page then ”…” then “Synchronization”).
Click the gear icon (Channel settings) on your Airbnb connection.
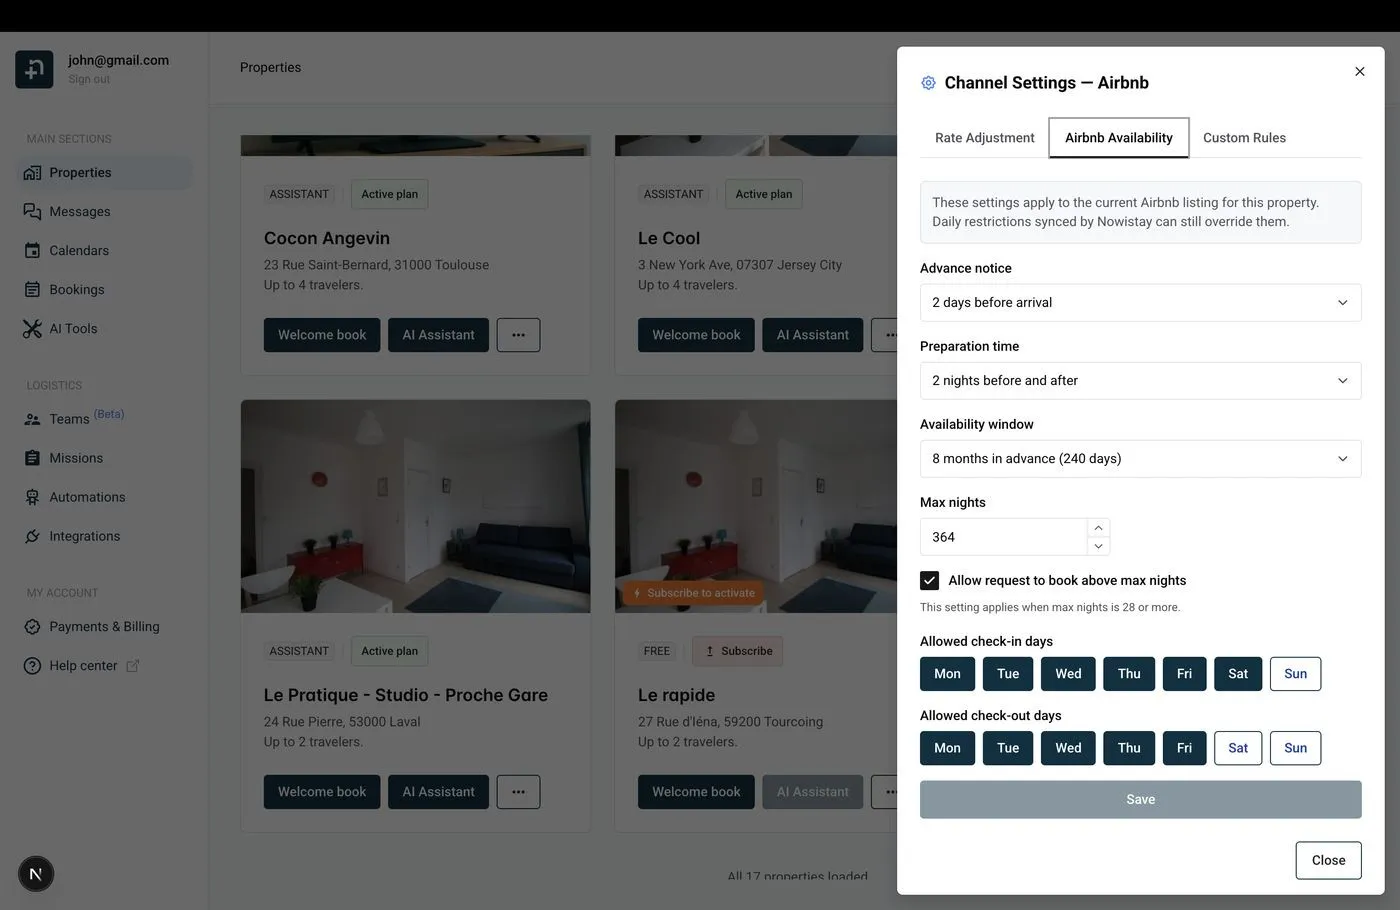
Open the Airbnb Availability tab and review each setting:
Airbnb Availability settings in Channel Settings
Advance notice: how much lead time before a guest can book (same day, 1 day, 2 days, etc.).
Preparation time: number of blocked nights between bookings for cleaning turnaround.
Availability window: how far ahead guests can book (e.g., 6 months, 12 months).
Max nights: maximum length of a reservation.
Allowed check-in / check-out days: restrict which weekdays guests can arrive or depart (e.g., Friday and Saturday only for weekend rentals).
Set up Rate Adjustment for Airbnb
If Airbnb switched your account to the host-only fee model (about 15.5%), you should increase your Airbnb rate to compensate:
In your property’s Synchronization section, click the gear icon (Channel settings) on the Airbnb connection.
Go to the Rate Adjustment tab.
Enter a positive percentage (e.g., +15%) to increase the rate sent to Airbnb.
Click Save.
This way, your calendar still shows your base rate, but Airbnb receives a higher rate that offsets the commission. Guests always see the total price, so this has zero impact on bookings.
Markup from your previous PMS: when you connect Airbnb, Nowistay copies your current Airbnb prices into its calendar. If Beds24 added a markup on Airbnb prices, those marked-up prices became your base prices and would also be sent to your other channels: lower your base prices in the calendar, then put the markup back for Airbnb only with the Rate Adjustment.
Upcoming Airbnb and Booking.com reservations are retrieved automatically when you connect those channels. Direct bookings, bookings taken by phone or email, and Vrbo bookings made before the connection are not: import them from the CSV file you exported from Beds24, once your Airbnb and Booking.com reservations show in the calendar.
Go to Bookings, click the … button, then Import as CSV.
Choose the Property, select your file and click Analyze.
Match the columns (required: Arrival, Departure, First name, Last name, Amount, Currency, Status), check the Preview of the result, then click Import and Confirm import.
Duplicates and upcoming stays that overlap an existing booking are skipped automatically. Full guide: Import bookings from a CSV file.
Step 8: Connect PriceLabs for dynamic pricing
If you were using PriceLabs with Beds24 for dynamic pricing, you’ll need to reconnect it to work with Nowistay. Since PriceLabs was connected through your Beds24 account, you need to disconnect it from Beds24 first, then set it up again with Nowistay.
Disconnect PriceLabs from Beds24
Log into your PriceLabs account.
Remove the listings that were connected through Beds24.
Once disconnected from Beds24, add your listings again in PriceLabs: this time they’ll sync through Nowistay’s channel manager. Follow our step-by-step guide to set up the connection:
Your dynamic pricing rules and strategies in PriceLabs will continue to work, only the connection method changes from Beds24 to Nowistay.
Step 9: Connect your smart locks
If you use smart locks for guest access, Nowistay can automatically generate and share access codes with your guests. Nowistay supports the following smart lock brands, connected from Integrations > Smart locks:
Each integration generates unique access codes per booking and can share them automatically with guests through your automated message templates using the {{smartlock_code}} variable. The codes are time-limited to the guest’s check-in and check-out dates for maximum security.
If you were using a smart lock integration through Beds24, set it up again in Nowistay by following the guide for your smart lock brand above.
Step 10: Migrate your automated messages
If you used Auto Actions in Beds24 to send automated emails to guests (booking confirmation, check-in instructions, checkout reminders, etc.), you can recreate them in Nowistay using Guest Message Templates.
How to create templates in Nowistay
Go to Automations in the left sidebar.
On the Guest Messages row, click Manage messages to open the templates panel.
Click Add message to create a new template, or click Generate with AI to let Nowistay create a set of templates automatically.
For each template, configure:
Trigger event: Booking Confirmed, Check-in, Check-out or Manual
Timing (hours), with Before the event or After the event (e.g. 48 hours before check-in)
Subject and Message body: copy-paste the text from your Beds24 Auto Action’s email template
To copy content from Beds24: open your Auto Action, go to the Messaging tab, and copy the email body. Paste it into the Nowistay message body field. Then replace the Beds24 variables with Nowistay variables (see mapping table below).
Beds24 Trigger: Check-out, Time: +1 day → Nowistay Check-out, 24 hours after
Conditions
Like Beds24’s “Booking Source” filter, Nowistay lets you restrict templates with Apply to bookings from (All platforms, Airbnb, Booking.com, Vrbo, Expedia or Direct booking) under Advanced options and by booking status (Confirmed, Pending, etc.). You can also add conditions based on smart lock code availability or minimum stay.
Example: Check-in instructions email
In Beds24, you might have an Auto Action like this:
Trigger: Check-in, -2 days
Subject: Your stay at [PROPERTYNAME] starts soon!
Body: Hi [GUESTFIRSTNAME], your check-in is on [FIRSTNIGHT] at [CHECKINSTART]. The address is [PROPERTYADDRESS].
In Nowistay, recreate it as:
Trigger: Check-in, Timing: 48 hours, Before the event
Subject: Your stay at {{property_name}} starts soon!
Body: Hi {{guest_first_name}}, your check-in is on {{arrival_date}} at {{check_in_time}}. The address is {{property_address}}. Here is your welcome guide: {{welcome_guide_url}}
Multilingual templates
Nowistay automatically detects the guest’s language and sends the matching version. You can add translations for up to 15 languages on each template, or use the Translate from default button to auto-translate with AI. This replaces the need for separate Auto Actions per language in Beds24.
Step 11: Replace the Beds24 booking widget
If you use the Beds24 Booking Page widget on your website for direct bookings, you can replace it with Nowistay’s Direct Booking widget.
Set up Direct Booking in Nowistay
Go to Integrations in Nowistay and find Direct Booking.
Click Configure and connect your Stripe account for payment processing.
Configure your widget settings:
Payment mode: full payment or split payment (e.g., 30% now, rest before arrival)
Primary color: match your brand’s hex color
Font family: choose from Inter, Roboto, Open Sans, Lato, Montserrat, or Poppins
Terms & conditions URL: link to your terms page
Add taxes if applicable (per stay, per night, or per guest per night).
Click Create widget (Single property or Multiple properties), then copy the generated Embed code.
Replace the widget on your website
On your website, find the existing Beds24 booking widget code (usually an iframe or script tag pointing to beds24.com).
Remove the Beds24 code completely.
Paste the Nowistay embed code in its place. The embed code is a small snippet containing a div element and a script tag that loads the Nowistay booking widget with your unique property token and preferred language. You’ll find it ready to copy in the Direct Booking configuration panel.
The widget is responsive, auto-resizes, and works on any platform (WordPress, Webflow, Wix, Squarespace, or plain HTML).