Sending the right message at the right time is key to a great guest experience, but doing it manually for every booking takes a lot of time. With Nowistay’s automated guest messages, you can set up messages that send automatically when a booking is confirmed, before check-in, or at check-out.
You can generate templates with AI in seconds, personalize them with dynamic variables (guest name, check-in time, welcome guide link, deposit link, identity check link, WhatsApp link, smart lock code, your own property variables, and more), choose how the message is sent (OTA inbox, email, WhatsApp, a combination, or by email to a team member), add conditions to target the right bookings, preview exactly what your guest will receive, and monitor every message from a single dashboard.
Even better, you can create multilingual versions of each template so your guests receive the message in their own language, with automatic fallback to the default language when needed.
This guide walks you through everything, step by step.
To use automated guest messages, you’ll need:
If you haven’t connected your property yet, check our guide on how to create your first property. To also send WhatsApp messages, see WhatsApp messaging with travelers.
You can also go directly to app.nowistay.com/hub/automations.
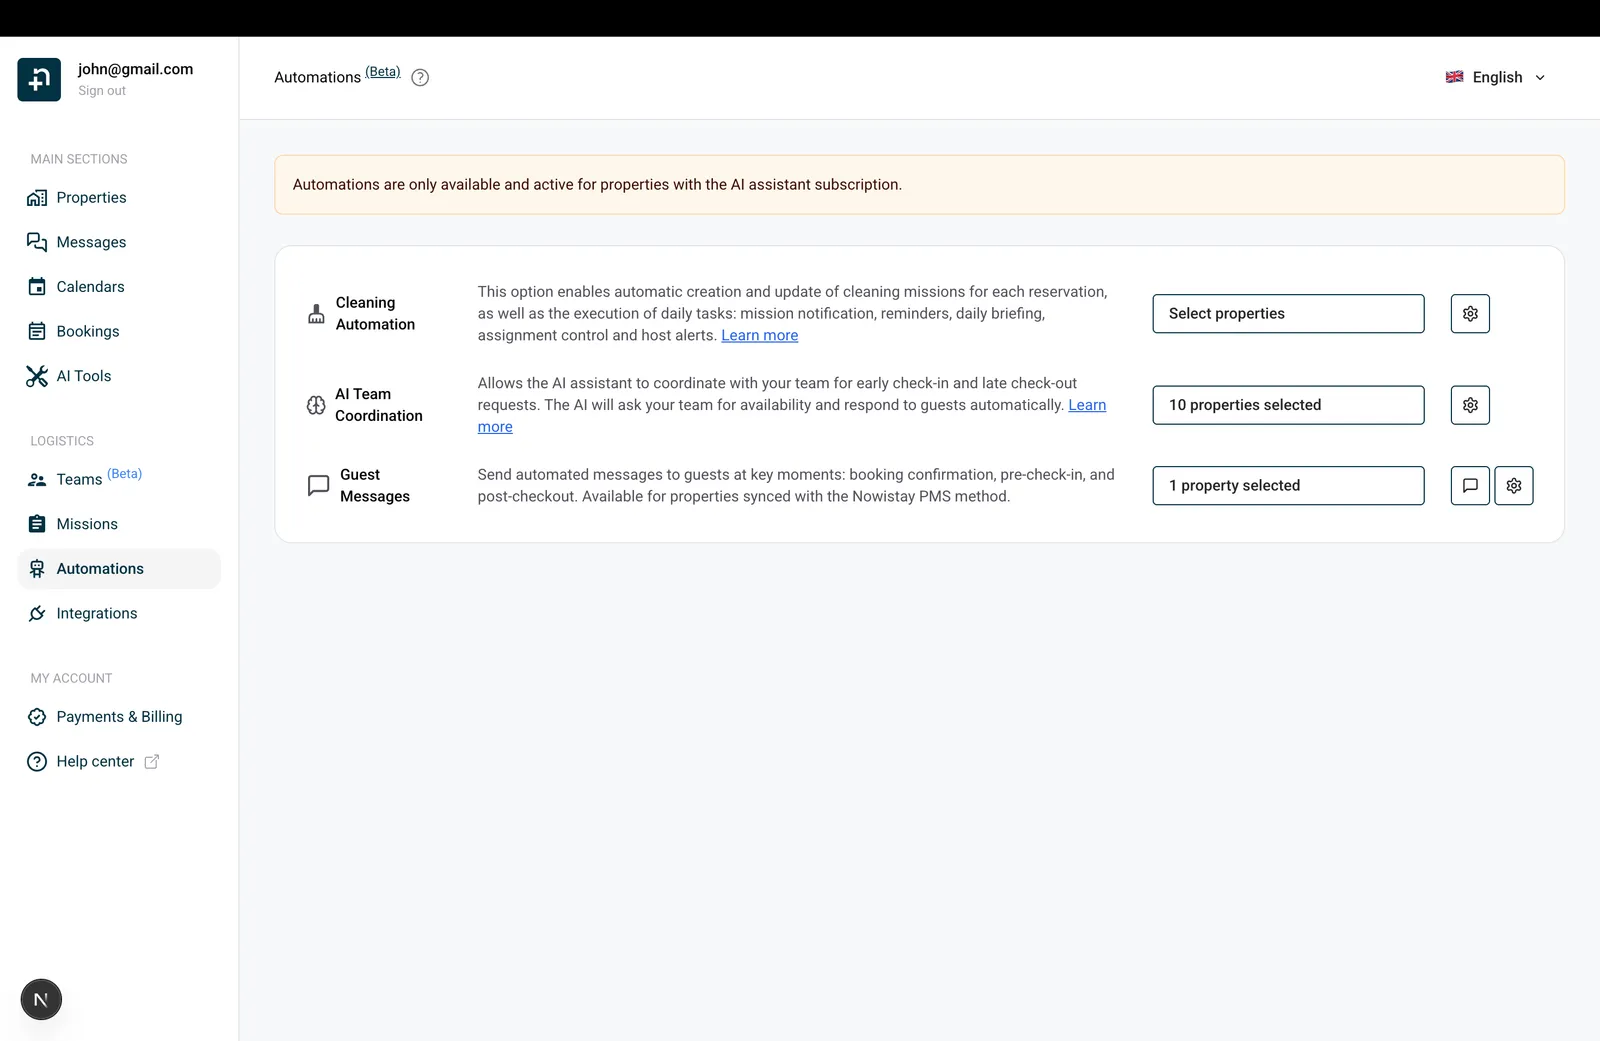
On the Guest Messages row, you’ll see a property selector. Click it to choose which properties should have automated messages enabled.
Only properties connected through the Nowistay PMS method appear in this list. If a property is missing, make sure it’s synced via the PMS integration.
On the Guest Messages row, click the message icon (the speech bubble icon). This opens the “Guest Message Templates” panel where you create and manage all your templates.
If this is your first time, you’ll see a message: “No message templates yet. Add templates to automatically send messages to your guests at key moments.”
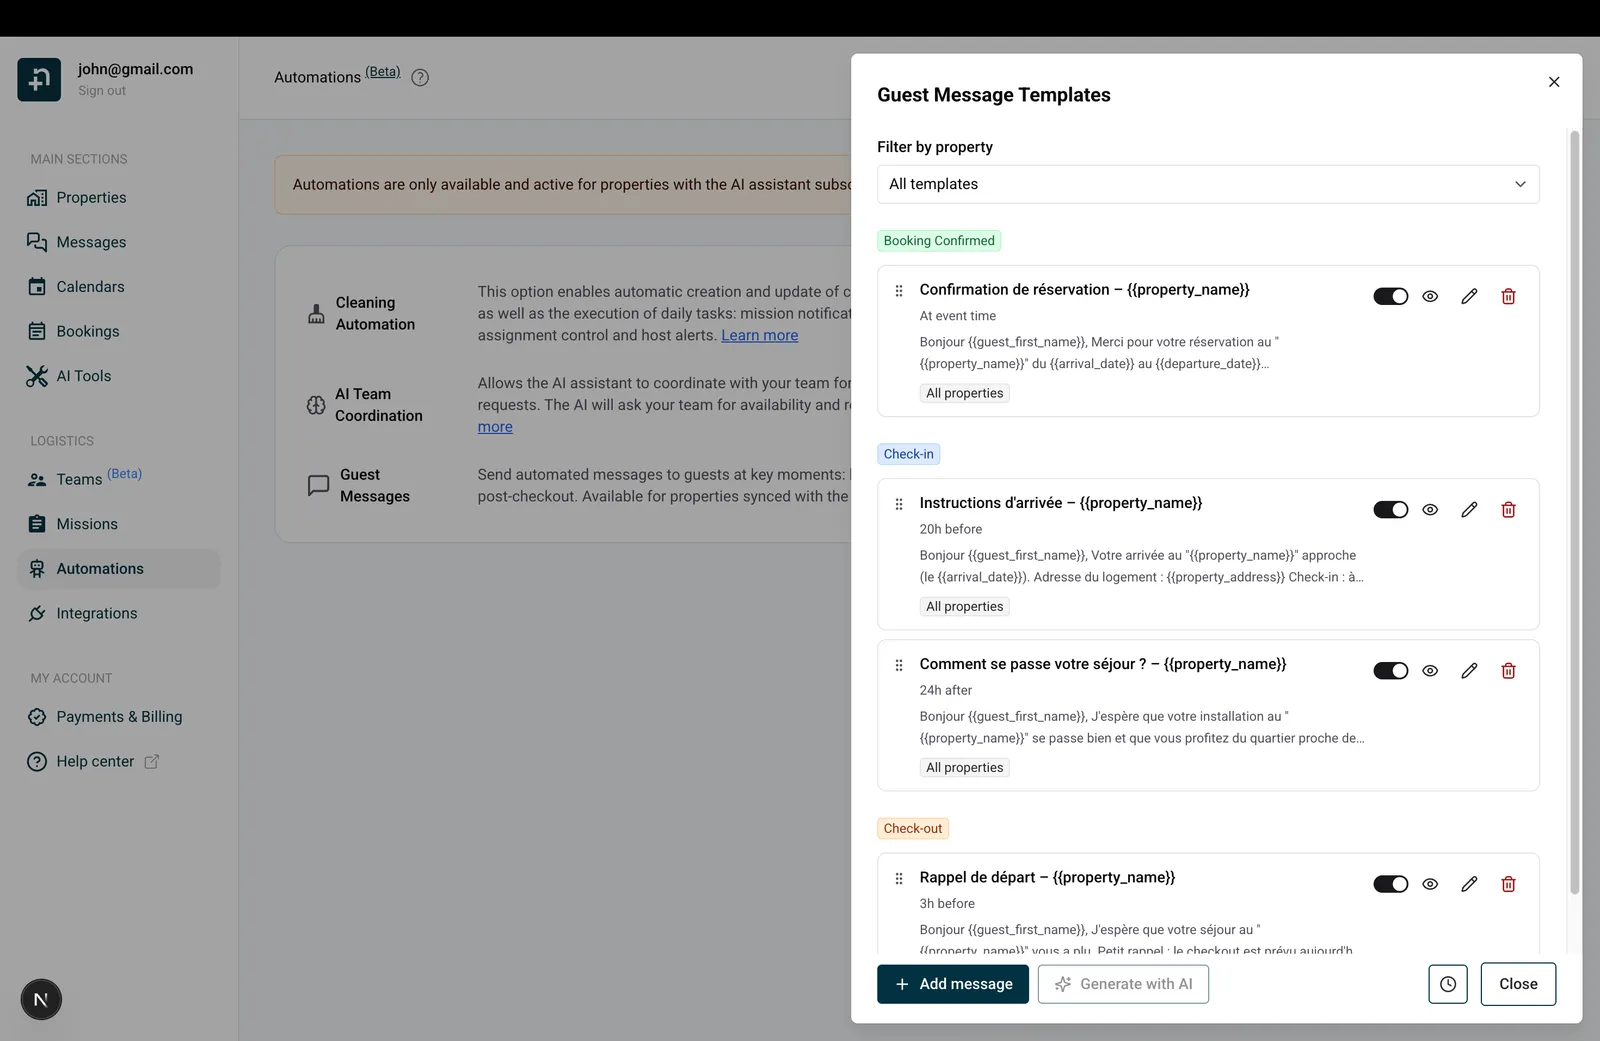
You have two options to get started:
If you haven’t created any templates yet, click the “Generate with AI” button. The AI will create a complete set of templates covering your three key moments:
The generated templates are personalized based on your property details, your welcome guide content, and your communication style. Generation usually takes a few seconds.
Once generated, you can edit, reorder, or delete any template. If you want to start fresh, delete all existing templates and the “Generate with AI” button becomes available again.
Click ”+ Add message” to open the template editor and build a template from scratch. This is explained in detail in the next step.
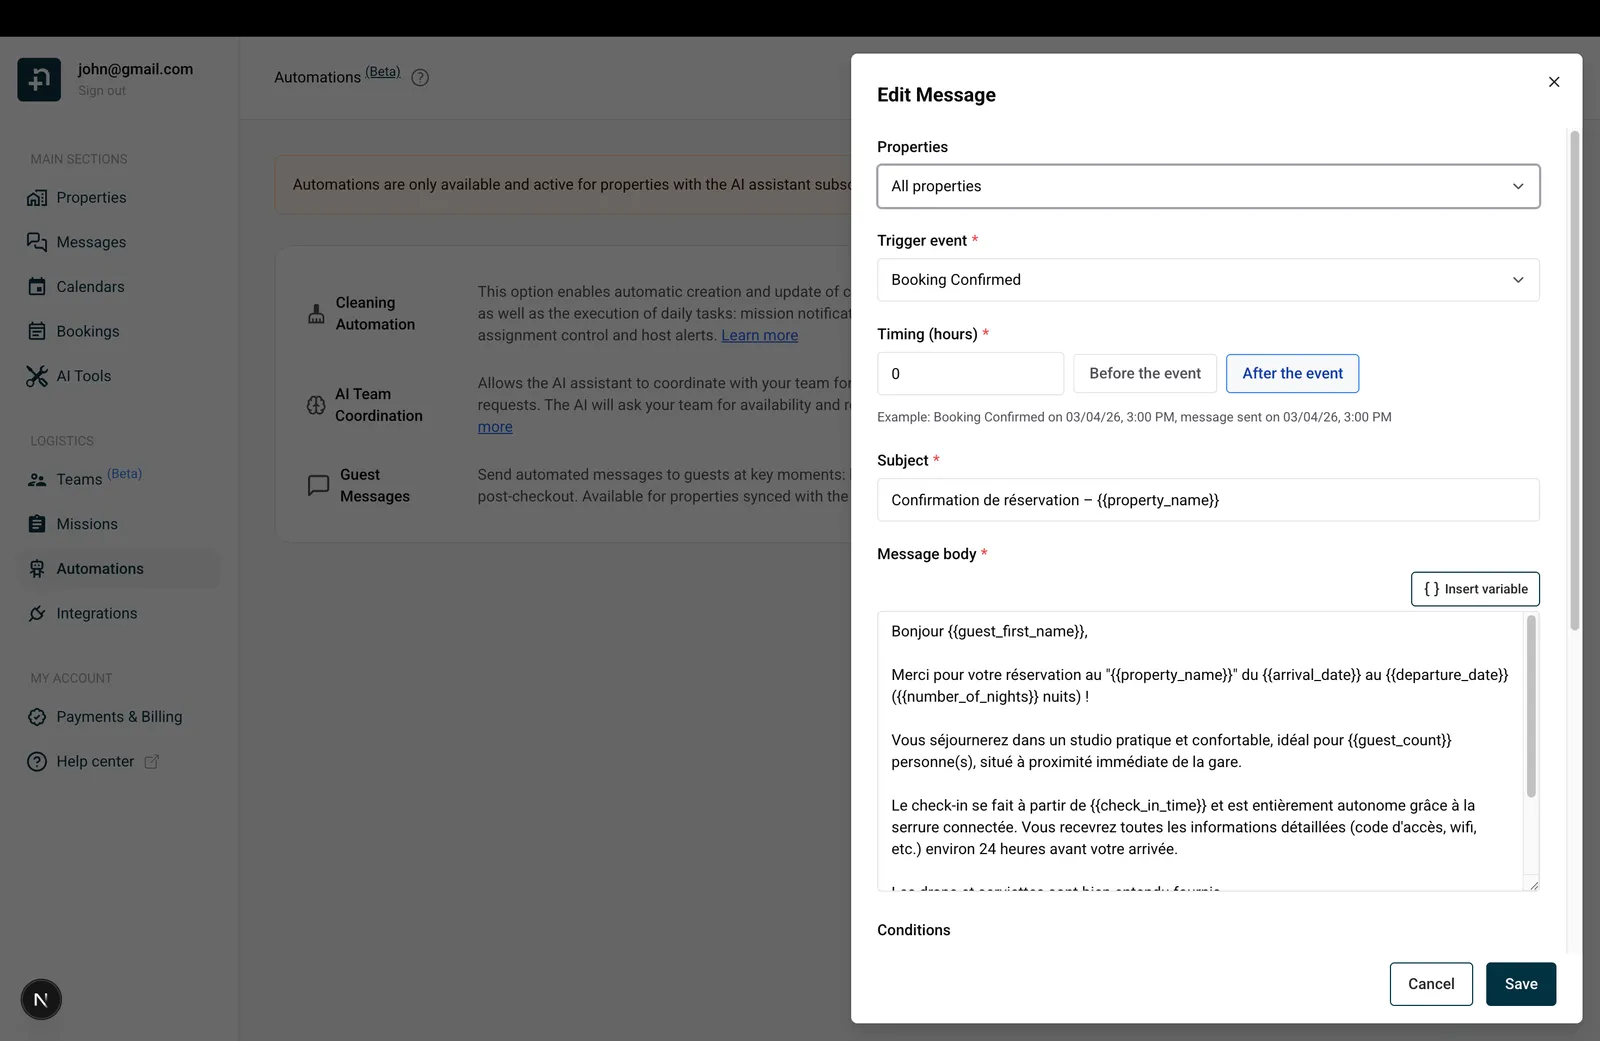
Whether you’re editing an AI-generated template or creating a new one, the template editor lets you configure everything about your automated message. Here’s each field explained:
Choose which properties this template applies to:
This is when the message should be triggered. Pick one:
Manual templates. Pick “Manual” when you want a ready-made message you can send on demand instead of on a fixed event. The editor shows the helper text “Manual templates are only sent from the preview drawer.” The Timing (hours) field is disabled (the message is never scheduled), and conditions are not applied automatically since you pick the booking yourself. Typical use cases: damage report follow-ups, custom check-in instructions for a specific booking, ad-hoc payment reminders, or any other message you compose often but with case-by-case tweaks.
How to send a manual template. Open the preview dialog (eye icon on the template card), pick a booking, and click “Preview”. Nowistay resolves every variable as usual with the booking’s real data: guest name, dates, smart lock code, and so on. Because the template is manual, the Subject and Message body fields become editable directly in the preview: tweak them with case-specific details (an exact arrival hour, an internal reference, an apology) and click “Send now” to deliver. See Step 6 below for the full preview workflow.
This controls how many hours before or after the trigger event the message is sent. The field is disabled when the trigger event is “Manual”, since manual templates are not scheduled.
The editor shows a live example below the field. For instance: “Example: Check-in on 15/03/26 3:00 PM, message sent on 14/03/26 3:00 PM” (for 24 hours before check-in).
The “Send via” dropdown controls who receives the message and on which channel. There are three options:
The helper text under the field reminds you: “Auto sends via OTA when available, otherwise email. WhatsApp mode sends email when valid and also sends WhatsApp. Use the switch below to add WhatsApp in Auto mode.”
Sending to a team member. When you pick “Team member” in the Send via dropdown, a second field appears just below: “Team member”. Open it and select the person who should receive this message. Only active team members with a valid email show up in the list. If you’ve restricted the template to specific properties at the top of the form, only team members assigned to those properties are eligible. You can personalize the message with team-specific variables ({{team_member_first_name}}, {{team_member_last_name}}, {{team_member_full_name}}) alongside the usual booking variables (guest name, dates, property, smart lock code, and so on).
Example: alert your check-in team member of an upcoming arrival. A typical use case is to notify the person handling check-ins a few hours before a guest arrives, so they have everything ready. Here’s the configuration:
You can build the same kind of internal alert for any moment in the booking: a cleanup notification for the housekeeping team by switching the trigger event to Check-out, or a “new booking received” briefing with Booking Confirmed.
Add WhatsApp on top of Auto. Inside the message body area, switch to the “WhatsApp” tab. There you’ll find a toggle: “Also send on WhatsApp”. Turn it on and Nowistay will deliver the message through BOTH channels: the standard channel chosen by Auto (OTA inbox or email) and WhatsApp. The helper text reads: “Enable this to also send the short WhatsApp version. In WhatsApp mode, it is always on.”
WhatsApp message body. The WhatsApp tab has its own short message body, separate from the standard one. WhatsApp messages have a character limit, so keep it concise. You can write it yourself or click “Generate WhatsApp” to have the AI produce a short WhatsApp version from your standard message. All your variables are preserved.
What WhatsApp needs: the property must be connected through Nowistay PMS, your AI Channel Manager subscription must be active, and the WhatsApp integration must be connected. If the guest has no phone number, the WhatsApp send is skipped (the email or OTA delivery still goes through).
Also send on WhatsApp to a team member. The same switch works in Team member mode. Open the “WhatsApp” tab of the message body and turn on “Also send on WhatsApp”: the selected team member receives the short WhatsApp version on their phone, in addition to the email. Two things must be true on the team member’s profile: a mobile phone number and WhatsApp notifications enabled (the editor warns you when the selected member can’t receive WhatsApp, and the switch stays off). Keep in mind that these messages are billed per message, at the same rate as the WhatsApp messages of your guest conversations; a note under the switch reminds you of this.
The subject line your guest will see when the message is delivered by email or in an OTA inbox. You can type plain text or include variables like {{guest_first_name}} or {{property_name}} to personalize it.
Example: “Welcome to {{property_name}}, {{guest_first_name}}!”
The subject is not used on WhatsApp (WhatsApp messages don’t have a subject line).
The main content of your message. Write your message and use the “Insert variable” button (the { } icon above the text area) to add dynamic placeholders. When the message is sent, each variable is replaced with the real data from the booking.
Above the body, two tabs let you switch between the Standard body (used for OTA and email) and the WhatsApp body. Both versions share the same trigger, timing, conditions and variables. Only the text content differs.
Variables are dynamic placeholders that get replaced with real booking data when the message is sent. Click the { } Insert variable button to browse them, or type them directly using the {{variable_name}} format. You can search by name using the search field at the top of the variable selector.
{{guest_first_name}}: Guest’s first name (e.g., “John”){{guest_last_name}}: Guest’s last name (e.g., “Doe”){{guest_full_name}}: Guest’s full name (e.g., “John Doe”){{guest_count}}: Number of guests / adults (e.g., “2”){{number_of_children}}: Number of children in the booking (e.g., “2”){{guest_phone_number}}: Guest’s full phone number (e.g., “+33612345678”){{guest_phone_last_4}}: Last 4 digits of the guest’s phone number (e.g., “7890”){{guest_phone_last_6}}: Last 6 digits of the guest’s phone number (e.g., “567890”){{host_first_name}}: the host’s first name.{{host_last_name}}: the host’s last name.{{host_full_name}}: the host’s first and last name.{{host_phone_number}}: the host’s phone number configured for the property.These values come from the host contact details saved on the property, so one template can use a different host name or number for each property. They are not the guest’s phone number or the voice assistant’s phone number. Fill in the property’s host contact details first; a missing value is replaced with empty text. Example signature: “{{host_first_name}}{{host_last_name}} | {{host_phone_number}}”.
These variables are resolved with the team member selected on the template, and are most useful when Send via = Team member.
{{team_member_first_name}}: Team member’s first name (e.g., “Sophie”){{team_member_last_name}}: Team member’s last name (e.g., “Martin”){{team_member_full_name}}: Team member’s full name (e.g., “Sophie Martin”){{arrival_date}}: Check-in date in DD/MM/YYYY format (e.g., “15/03/2026”){{departure_date}}: Check-out date (e.g., “20/03/2026”){{number_of_nights}}: Number of nights (e.g., “5”){{arrival_day_name}}: Day of the week of arrival (e.g., “Monday”){{arrival_month_name}}: Month of arrival (e.g., “March”){{days_to_checkin}}: Number of days until check-in, counted from today (e.g., “3”)Each date also exists in more formats in the variable selector: US format, long written form (e.g., “March 15, 2026”), and separate day, month, and year parts, for both arrival and departure.
{{check_in_time}}: Check-in time in HH:MM format (e.g., “15:00”){{check_out_time}}: Check-out time (e.g., “10:00”){{property_name}}: Property name (e.g., “Sunny Apartment”){{property_address}}: Full address (e.g., “123 Rue de la Paix, Paris”){{welcome_guide_url}}: Personalized welcome guide link for this booking, including extras access when available and voice access only when active{{smartlock_code}}: the main door’s keypad code, with the compatibility fallbacks explained below.{{smartlock_code_2}}: the issued keypad code of Door 2, empty if none is available.{{smartlock_link}}: the booking’s guest page for opening one or two link-enabled doors during their permitted access windows.{{property_capacity}}: Maximum number of guests (e.g., “4”)The selector also offers the address split into parts (line 1, line 2, city, postal code) and the property’s currency.
On top of the built-in variables above, you can define your own property variables: placeholders whose content you write yourself, with a different value per property (wifi code, parking instructions, access details, and so on). They appear in the variable selector under the “Property variables” group and use the {{property.your_variable}} format. See the dedicated section below for the full setup.
{{booking_channel}}: Booking platform (e.g., “Airbnb”){{reservation_number}}: Booking reference number{{nowistay_reservation_id}}: The booking’s Nowistay reservation ID, the one shown across the Nowistay app (e.g., “12345”){{booking_amount}}: Total amount (e.g., “450.00”){{currency}}: Currency code (e.g., “EUR”){{identity_check_link}}: Personal link the guest opens to complete identity verification{{deposit_payment_link}}: Personal link the guest opens to authorize the security deposit (pre-authorization, no immediate charge){{whatsapp_link}}: One-click WhatsApp link that opens the guest’s dedicated conversation with you on WhatsApp. Useful to drop in OTA or email messages so the guest can move the conversation to WhatsApp in one tap.{{voice_access_code}}: guest’s private code for the voice assistant (phone and welcome guide).{{voice_phone_number}}: phone number the guest can call to talk to the assistant.The voice code and phone number are filled only when the voice assistant is active.
{{upsells_access_code}}: the booking’s 6-digit guest identification code, available without the voice option.{{upsells_link}}: a direct link to the guest’s personal extras page. It remains available if you want to share that page separately.{{upsells_list}}: the extras currently available for this stay, with prices.{{upsell.<key>.name}}, {{upsell.<key>.price}} and {{upsell.<key>.link}}: select the actual extra in the picker to insert its name, price or link.Use {{welcome_guide_url}} in your automated guest messages. Nowistay personalizes this welcome guide link for each booking: it includes access to available extras and adds voice access only when the voice assistant is active. If you offer no extras, the same variable still opens the welcome guide. You do not need a separate link for each feature.
Add a Boutique page or an Extra (product) block to the guide so guests can browse and purchase your extras. Sharing the link does not add the catalog to the guide automatically.
A guest opening this personalized link does not need to enter a phone number or code to access their extras. With the guide’s general link or QR code, they can identify their booking using the phone number on the reservation or their 6-digit access code.
Open a reservation from Bookings, then find Guest access code in the Extras section. Use the copy icon to share it manually, or insert {{upsells_access_code}} in an automated message to send each guest their own code. Extras access works without the voice option. This identifies the booking; it is not a door or smart lock code.
Example: “You can browse and purchase our extras in the Boutique in your welcome guide: {{welcome_guide_url}}. If you open the general guide link and are asked to identify your booking, your code is {{upsells_access_code}}.”
Existing templates using {{welcome_guide_voice_url}} continue to work. This older variable is hidden from the dropdown; use {{welcome_guide_url}} for new or updated templates.
In the message editor, find all three variables in the Property category. Door numbers match the numbered rows in Integrations; the door name is the label you chose for guests.
{{smartlock_code}}: Door 1’s keypad code, or the other door’s available code if the main door has none. Keep this variable in existing messages.{{smartlock_code_2}}: the issued keypad code for Door 2. It stays empty if that door has no issued code.{{smartlock_link}}: one personal door-opening page for the booking, with a separate button for each active door using Open via link. Two link doors share this same link; there is no second link variable.When two keypad doors can accept the same code, Nowistay tries to reuse it for the booking. Matching codes are not guaranteed: device rules, existing codes and offline-code methods may require different codes. The booking details show the code for each door, even when both values match.
If Door 1 is link-only and Door 2 has a keypad, Door 2’s code fills both {{smartlock_code}} and {{smartlock_code_2}}. If the two doors have different codes and an older template uses only {{smartlock_code}}, that variable includes both codes with door labels. Use both numbered variables when writing separate instructions for each keypad. The older {{nuki_code}} alias continues to work.
{{smartlock_code}}. Building entrance: {{smartlock_code_2}}.”{{smartlock_code}}. To open the building entrance, visit {{smartlock_link}} and confirm the opening.”{{smartlock_link}}, choose the building entrance or apartment door, then confirm.”Adapt these examples to the saved order and names. Keep variables unchanged in every translation. Use a booking-specific link in your messages rather than copying one guest’s URL into a reusable template or public guide. A link provides access to whoever holds it during its permitted window.
When generating templates with AI, Nowistay uses the configured door names and access methods to guide the instructions. Review the result: a link-only property should have opening instructions, without asking the guest to enter a keypad code.
Open a reservation from Bookings. After Financial, the drawer has separate Identity and Property access blocks, in that order. Property access shows the available keypad codes with their door numbers and names. If one code is missing, check that specific door; seeing the first code does not mean the second was generated.
The Door access link row uses an opening icon and tags naming the doors controlled by the link. The arrival entry shows the first detected check-in date and time; later openings do not replace it. On the bookings page, hover over the arrival icon in the status column to see the check-in tooltip and date.
The booking link opens a mobile-friendly page with one or two named door buttons. Only active doors configured for link access appear. Each button follows that door’s booking access window, including its margins. Outside the window, the guest cannot open that door. The page refreshes its status at the time boundary and when it regains focus; a loading failure offers a retry.
The guest chooses a door, then confirms Open door in a confirmation dialog. After a successful opening, that door has a 10-second wait before another opening. The page does not automatically send another open command. Refreshing the page does not open a door. If an attempt fails, read the error and retry deliberately once the problem is resolved.
A successful opening through the guest link records check-in for the booking. Merely viewing the page does not. A keypad opening with the booking’s code can also record check-in with Nuki, Tedee, Homeit, the Premium integration, TTLock locks connected to a gateway and igloohome locks connected to a Bridge. Keypad arrival detection is not available for every device. This is the same check-in information used by automated-message conditions; it does not verify the identity of the person holding the link or code.
To be alerted when a guest’s first entry is detected, turn on Guest checked in in Notifications > My notifications. It is off by default, and you receive it once per booking.
In the card and list views of Properties, the unlocked-padlock icon for Open property appears after the AI button when at least one active door supports remote opening. Open it to see a drawer containing only the available doors, including doors from different supported providers.
Choose the named door and confirm Open door. This host action is available without a booking time window and uses the same confirmation and 10-second wait after success. It does not require guest link access to be enabled and does not record a guest check-in. The device still needs to be reachable and the connected account must allow remote opening.
Some details change from one property to the next: the wifi code, the parking instructions, the door access. Until now, the only way to handle those differences was to duplicate a template for every property and edit one line in each copy. Property variables remove that duplication: create a variable once, give it different content on each property, and keep a single template that adapts automatically to every booking. Fewer templates to maintain means fewer places to edit whenever something changes.
The variable’s identifier is generated from its title and shown right below it, for example {{property.wifi_code}}. It never changes afterwards, even if you rename the title later, so templates that use it keep working.
Variables are shared across all your properties: create “Wifi code” once and it appears in the “Property variables” panel of every property, waiting for that property’s own content. Open the panel on each property and fill in the text that applies there. A property left without content simply gets empty text wherever the variable appears in its messages.
{{property.wifi_code}}). You can also type it manually, including in the subject lineThat’s it. When the message goes out, every guest receives the content defined for their property: one template, personalized per property.
The content you write for each property is translated automatically into the languages your templates use, so a guest messaged in Spanish gets the Spanish version of your wifi instructions inside the Spanish message. While a translation isn’t available yet, your original text is used. In the “Property variables” panel, each content shows how many languages it has been translated into, and you can expand the list to review them. If you add a new language to your templates later, existing variable contents are translated into it automatically.
{{property...}} identifier stays the sameUnderstanding where each message ends up (and where the guest can reply) helps you pick the right combination of channels for each template.
When Send via = Auto and the booking comes from an OTA, the message is delivered straight to the guest’s inbox inside that booking platform. The guest receives it the same way they’d receive a manual message from you on Airbnb or Booking.com.
Visible in the Messages thread: yes. The message appears in the unified conversation thread in Nowistay’s Messages section, alongside any other messages exchanged on that booking.
When the booking is a direct booking, a Vrbo booking, or when Send via = WhatsApp, Nowistay delivers the message by email to the guest’s address. The sender name is your host name, and if the guest replies to the email, it will be routed to guest conversation and the AI will reply.
Visible in the Messages thread: yes
This means that if the guest hits “Reply” on the email, their reply lands directly in messages conversation thread of the guest along with all other channel messages (all is unified). The AI will answer automatically and you receive an email notification. You can also manually send a message by email to the guest from the messages thread in the app.
WhatsApp delivery happens when Send via = WhatsApp, or when Send via = Auto and the “Also send on WhatsApp” toggle is enabled. The short WhatsApp version of the message is sent to the guest’s phone number.
Visible in the Messages thread: yes.
WhatsApp messages appear in the same unified conversation as OTA messages, with a small WhatsApp icon so you can tell them apart. From there you can keep chatting with the guest on WhatsApp directly from the Nowistay Messages section.
When Send via = Team member, the message bypasses the guest entirely and is sent by email to the team member you selected on the template. When the “Also send on WhatsApp” switch is on and the member’s profile has a mobile phone number with WhatsApp notifications enabled, they also receive the short WhatsApp version on their phone. These team WhatsApp messages are billed per message, at the same rate as the WhatsApp messages of your guest conversations. The OTA inbox is not used in this mode, and nothing is sent to the guest. This is the right channel for internal alerts and team coordination tied to a booking event (upcoming check-in, check-out, new booking received), not for traveler-facing communication.
Visible in the Messages thread: no. Team-member messages do not appear in the guest conversation thread (they are not sent to the guest). To confirm a team-member message was sent, open the clock icon (see “Monitor sent and scheduled messages” below): each scheduled message shows the recipient name and email, so you can tell guest messages apart from team-member ones.
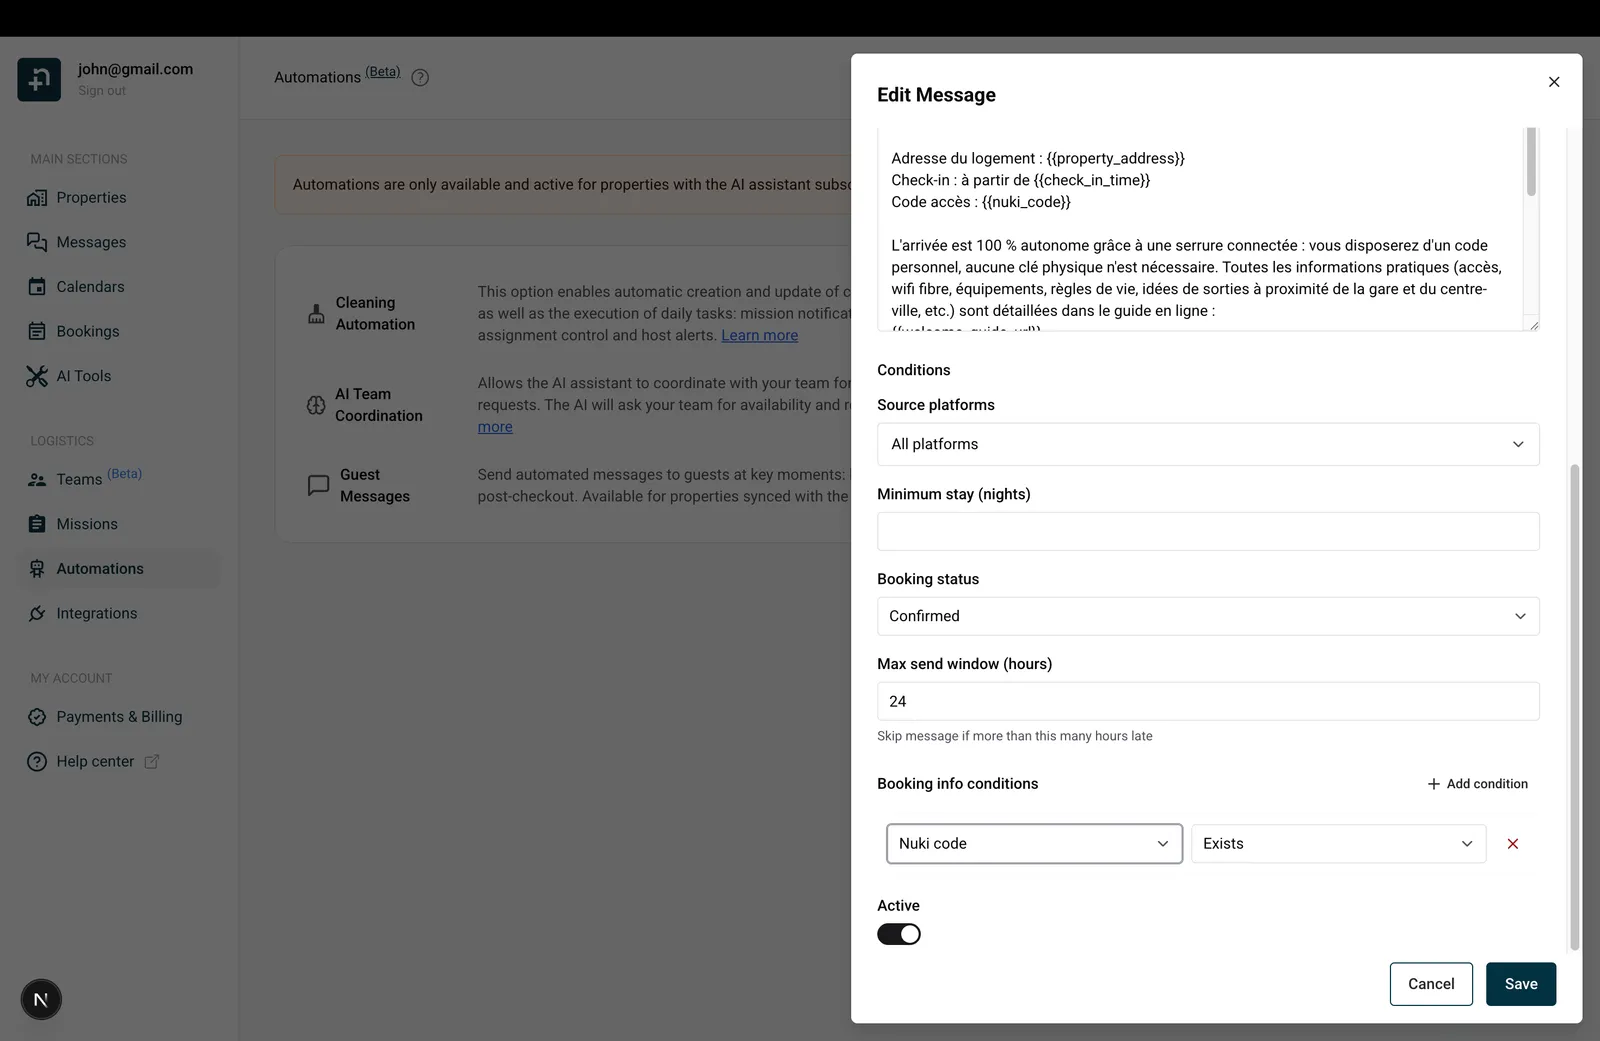
Below the message body, you’ll find the Conditions section. Conditions let you fine-tune exactly which bookings trigger this message. Here’s each condition explained:
Filter by the platform the booking came from.
Bookings imported from other sources cannot be targeted individually: they are covered when the filter is left on All platforms, and excluded as soon as you select specific platforms.
You can select multiple platforms. For example, select both “Airbnb” and “Booking.com” to cover OTA bookings but exclude direct ones.
When to use it: If you send different check-in instructions depending on the platform (for instance, Airbnb guests get a slightly different message than Booking.com guests), create two separate templates with different source platform filters.
Only send the message if the guest is staying at least this many nights.
When to use it: You might want to send a special welcome message with extra tips for long stays (e.g., only for guests staying 7+ nights), or skip a detailed check-in reminder for one-night stays where it would arrive too late.
Only send the message if the guest is staying at most this many nights. Both limits include the number you enter: with a minimum of 2 and a maximum of 6, the message goes out for stays of 2 to 6 nights. Leave the field empty (or set it to 0) for no limit. The maximum cannot be lower than the minimum.
When to use it: Combine it with the minimum stay to send different versions of the same message depending on the length of stay, for example a short check-in guide for stays of 1 to 3 nights, and a long-stay guide with laundry and grocery tips from 4 nights.
Two optional fields let you target bookings by how far in advance they were made. The lead time is the number of hours between the moment the booking is created and the check-in time.
When to use it: the classic setup is to split your communication for regular bookings (a short confirmation right after booking, then detailed check-in instructions 48 hours before arrival) but send one single combined message to last-minute guests instead of several messages within minutes of each other. Use the same value on both sides: set “Booked at least” to 50 on your regular confirmation and check-in templates, and create one combined template (trigger: Booking Confirmed) with “Booked less than” set to 50. Every booking then matches exactly one of the two setups. If you do this, remember the max send window advice below so the last-minute messages are not skipped.
If the guest’s dates change later, the lead time is re-evaluated automatically. For bookings imported in a batch (for example when you first connect a platform), the lead time counts from the moment the booking reached Nowistay, not from the original booking date.
Only send the message if the booking has this status. Options:
When to use it: In most cases, keep this set to “Confirmed” so you only message guests with firm reservations. You could create a specific template for cancelled bookings to send a follow-up or ask for feedback.
If the message is running late (for example, because the booking was imported after the trigger time already passed), this setting controls how late is too late. If the message would be sent more than this many hours after the intended time, it’s skipped entirely.
When to use it: If you import a batch of past bookings and don’t want guests to receive a “check-in reminder” for a stay that already started 3 days ago, a 24-hour window prevents that from happening.
A real example with last-minute bookings: The default 24-hour window can work against you if you accept reservations late on the arrival day. Say your check-in time is 5:00 PM and your check-in instructions are set to send 24 hours before arrival. A guest books at 11:00 PM on the day of arrival, six hours after your check-in time. The intended send time for that message (24 hours before a 5:00 PM check-in) was 5:00 PM the previous day, so by the time the booking lands it is already 30 hours late. With the window left at its 24-hour default, the message is treated as too old and skipped, and that guest never receives their check-in instructions. It is an easy one to miss: you set the timing to “24 hours before” once and forget that the same window also caps how late a message can still go out.
How to fix it: Set the window wide enough to cover your latest possible booking. For a 5:00 PM check-in where you take reservations up to around 11:00 PM the same day, raise the max send window to 30 or 31 hours instead of 24. A last-minute guest then still gets the message right after booking, while genuinely old imported bookings are still filtered out. A simple way to size it: take the hours your message sends before check-in (24 here), add the gap between your check-in time and the latest time you accept bookings (about 6 hours), then add an hour of margin.
This optional field guarantees breathing room between your automated messages: the message will never be sent less than this many minutes after the previous automated message sent for the same booking (1 to 1440 minutes).
When the delay is not satisfied yet, the message is not lost: Nowistay holds it and keeps retrying automatically, then sends it as soon as the delay has passed (as long as the max send window has not expired).
When to use it: last-minute bookings are the typical case. When a guest books a few hours before arrival, the confirmation and the check-in instructions can become due at the same moment. Set a minimum delay of 10 or 15 minutes on the second template and your messages go out one after the other, in order, instead of landing together. It also works as a simple way to build sequences: message 1 right after booking, then message 2 with a 180-minute delay.
Two things to know: messages you send manually with “Send now” ignore this delay (an explicit action always goes out immediately), and a message still waiting when the max send window closes is skipped.
These let you add custom rules based on specific booking information. Click “Add condition” to create one. Each condition has three parts:
1. Info type: what data to check:
2. Operator: how to check it:
Check-in detected and Children in the booking only offer “Exists” and “Does not exist”: they describe a yes/no state, so there is no value to compare. Paid extras only offers “Contains” and “Does not contain”. Number of adults and Number of children offer “Greater than”, “Less than”, “Equals” and “Does not equal”. Guest mood only offers “Equals” and “Does not equal”.
3. Value (required for every operator except “Exists” and “Does not exist”): the value to compare against. For Guest full name, the comparison ignores case (so “smith” matches “Smith”). For Nowistay internal booking ID, paste the exact booking ID. You can find it in the booking detail panel or in the URL of a booking page. For Number of adults and Number of children, type a whole number (0 or more). For Paid extras, there is nothing to type: pick the extra by name from the dropdown. Only active extras are listed; an extra you archive later stays on the conditions that already use it, marked “archived”. For Guest mood, pick Happy or Unhappy from the dropdown.
If no conditions are set, you’ll see “No conditions” and the message is always sent.
Practical examples:
{{smartlock_code}} so you don’t send a message with an empty code.{{identity_check_link}} only if the guest hasn’t completed identity verification yet.{{deposit_payment_link}} only if the guest hasn’t authorized the deposit yet. Always use “Equals” or “Does not equal” with the “Paid” / “Not paid” value for this condition: “Exists” and “Does not exist” have no effect on the security deposit.{{number_of_children}} in the body to mention the exact count.{{welcome_guide_url}} in the body and instructions to open the Boutique, and skip the reminder for guests who have already bought it.You can add multiple conditions: all must be met for the message to send. For example, “Number of adults” + “Equals” + 1 together with “Number of children” + “Equals” + 0 reaches solo travelers only. Remove a condition by clicking the X button next to it.
What if a condition isn’t met yet? Booking info conditions are checked at the moment the message is about to go out. If a condition isn’t met yet (the lock code hasn’t been generated, the guest hasn’t completed identity verification), Nowistay doesn’t give up: it keeps rechecking regularly and sends the message as soon as the condition becomes true, as long as the max send window hasn’t expired. If the window closes first, the message is skipped. For the children conditions (Children in the booking and Number of children), bookings where the platform doesn’t report a guest breakdown are treated as having no children, so “Number of children” + “Equals” + 0 is met. For Number of adults, a booking with no reported number of adults never meets the condition, whatever the operator: the message waits and is skipped when the max send window closes. For the paid extras condition, only a completed payment counts: an extra that is requested, approved but not yet paid, or refunded is treated as not paid. Keep in mind that this condition filters a message, it doesn’t trigger one: a message triggered at booking confirmation with a “Contains” condition goes out only if the guest pays for the extra before the max send window closes.
Guest mood is also read when the message is about to go out, so the message follows the latest mood, including one you set yourself. A message restricted to happy guests waits while the guest is unhappy and is skipped if the max send window closes first. Keep this condition off arrival and access messages, which would then wait too.
For a message containing both keypad codes, add Lock code + Exists and Door 2 code ready + Exists. For a link-only message, use Smart lock access link + Exists instead of requiring a keypad code. If Door 1 is link-only and Door 2 has a keypad, the first code condition can be satisfied by Door 2’s fallback code.
Check-in detected + Exists uses the first recorded arrival on a smart lock door. Nowistay stores that first entry once and never changes it, so a second opening or a late cleaner entry cannot move it. A host opening or a page view does not satisfy it. Three events can record it:
igloohome, Tedee, TTLock and Homeit locks never record a check-in, even when the guest’s code was delivered and used. On those brands, a template with Check-in detected + Exists never sends, and Does not exist always sends. This condition filters messages; the scheduled Check-in trigger still refers to the planned arrival time. Keep a send window long enough for the condition to become true.
At the bottom of the editor, the Active switch lets you enable or disable a template. When turned off, the template won’t trigger for new bookings but is kept so you can reactivate it later.
One of the most powerful features of Nowistay’s automated messages is built-in multilingual support. Instead of creating separate templates for each language, you can add language variations directly within a single template. When the message is sent, Nowistay automatically detects the guest’s language from their booking profile and sends the matching version.
Each template has a default language: this is the main version you write first (typically the language most of your guests speak). You can then add translations for up to 15 supported languages including English, French, Spanish, German, Italian, Portuguese, Dutch, Japanese, Korean, Chinese, Arabic, Hindi, Bengali, Turkish, and Russian.
When a message is scheduled for a guest:
This means you don’t need to worry about every language: just add translations for the ones that matter most to your guests, and the default version covers everyone else.
To add a new language to a template:
You can switch between language tabs at any time to edit each version independently. Each language variation has its own subject and message body (and its own WhatsApp version), but shares the same trigger event, timing, conditions, and properties.
Don’t want to translate manually? Nowistay can translate your template using AI. When editing a language variation:
{{variables}} exactly as they areThe AI translation is smart enough to produce natural, contextually appropriate messages, not word-for-word literal translations. It also handles all dynamic variables correctly, so {{guest_first_name}} or {{property_address}} will still be replaced with the right values when the message is sent.
Instead of translating language by language, click the “Translate…” button next to the language tabs. A language panel opens: select all the target languages you want (languages already added to the template are pre-selected), then confirm. Nowistay translates the subject, the message body, and the WhatsApp version into every selected language in a single run, adds the corresponding tabs, and lets you review each version before saving. It also works on a template you haven’t saved yet.
If you edit the default-language content after translations were generated, the editor shows a notice that the translations may be outdated, so you can re-run the translation and keep every language aligned with your latest wording.
To remove a language variation you no longer need, switch to that language tab and click the remove button. The default language cannot be removed.
{{variables}}, so they work identically regardless of languageBefore going live, you can preview exactly what your guest will see and even send a real test message.
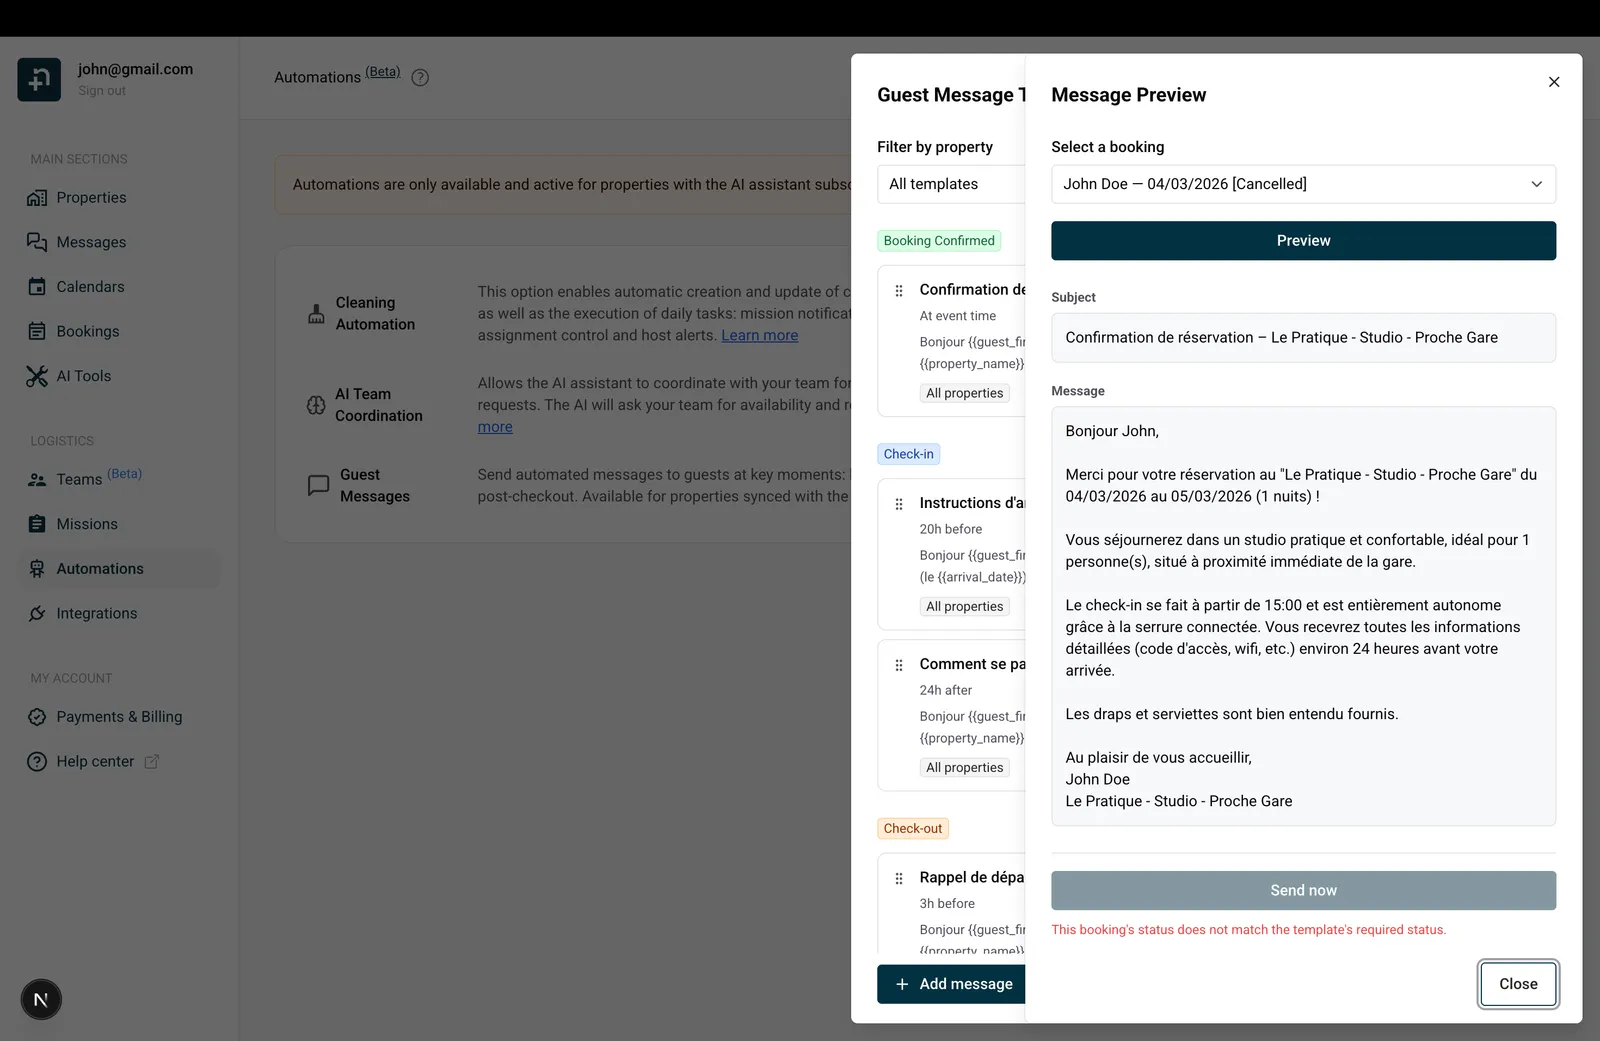
Manual templates: editable preview. If the template’s trigger event is “Manual”, the Subject and Message body fields are editable directly in the preview. The standard resolution still runs (every variable is replaced with the booking’s real data), so you start from a fully filled-in message and only tweak the parts you want to change for this specific booking. The WhatsApp body is also editable when the template uses WhatsApp delivery. For all other trigger events, the preview is read-only.
The preview shows:
For smartlock templates, select a booking for the property being tested. Check each door’s name and code, the link, and the host contact details. A missing PIN is not generated by the preview. A preview uses an existing guest access link when available; viewing a preview does not create a new one. A blank link or code therefore needs checking against the booking and integration before sending. Send now sends a real message, not a harmless preview.
The system also checks whether this message would actually be sent for the selected booking. If it wouldn’t, you’ll see a reason explaining why, including:
This makes it easy to debug why a particular guest didn’t receive a message.
If the message is eligible, you’ll see a “Send now” button with a warning: “This will send a real message to the guest through their booking platform.”
Click “Send now” and confirm to send the message immediately for that booking. The button changes to “Message sent!” once delivered. This is useful for testing, or for manually sending a one-off message to a specific guest.
Back in the templates panel, you have several ways to organize your templates:
Templates are grouped by trigger event (Booking Confirmed in green, Check-in in blue, Check-out in orange). Within each group, drag the handle on the left side of any template to reorder. If multiple templates match a booking, they send in this order.
Each template card has an on/off switch on the right side. Inactive templates appear with a dashed border and muted background so you can easily spot them. Turning a template off keeps it saved: you won’t lose your work.
Use the “Filter by property” dropdown at the top of the panel to see only templates that apply to a specific property, or choose “All templates” to see everything.
Click the duplicate icon on a template card to create a copy you can adjust, useful when you want one template per OTA, or per property, with small variations.
Click the trash icon on any template card. You’ll be asked to confirm: “Are you sure you want to delete this message template?”
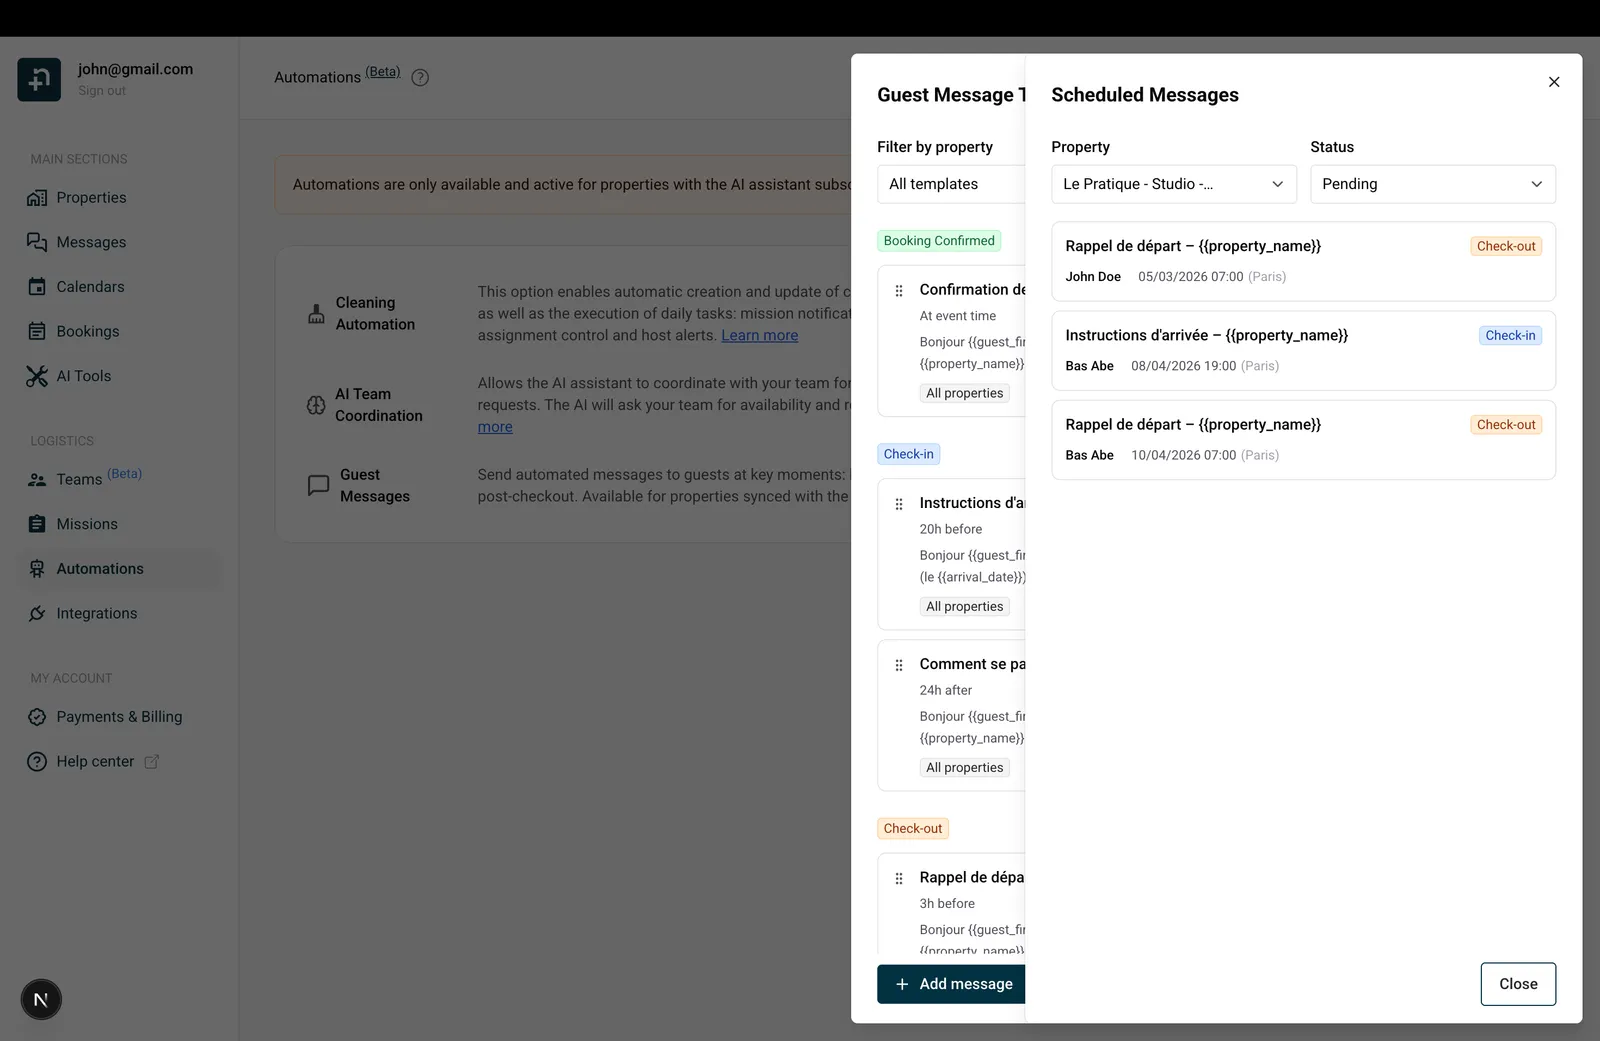
Click the clock icon at the bottom-right of the templates panel to open the “Scheduled Messages” view. This is your full delivery history per guest, including team-member messages that don’t appear in the Messages thread.
Each entry shows:
The list loads 20 messages at a time and loads more as you scroll down.
Cancel a scheduled message. Plans changed, or a message no longer makes sense for one specific booking? Every Pending message shows a small red X button (“Cancel message”). Click it and confirm: the message is cancelled and will not be sent to the guest. The cancellation itself cannot be undone, but you can still send the same content manually later from the message templates (“Preview”, then “Send now”). Cancelling only affects that one scheduled message for that one booking; the template stays active and keeps scheduling messages for other bookings.
Tip: if you want to double-check that a message was actually delivered, or see why it was skipped, the Scheduled Messages view is where you’ll see it.
{{guest_first_name}} and {{property_name}} to make the message feel warm, not robotic{{welcome_guide_url}} so your guests have everything they need in one link{{whatsapp_link}} so the guest can move the conversation to WhatsApp in one tap. It opens their dedicated conversation with you on WhatsApp.{{identity_check_link}} with the “Identity Verification” condition set to “Does not exist”, and {{deposit_payment_link}} with the “Security deposit” condition set to “Equals” + “Not paid”, so the reminders only go out when there’s actually something to do.{{welcome_guide_url}} to promote an extra only to guests who haven’t bought it yet{{smartlock_code}}, and a separate template with “Lock code” set to “Does not exist” that gives alternative access instructions